
Apr 14, 2013
 I admit, I have a favorite corner of the house… Ok, technically it’s a hallway (a teeny tiny one). It’s the 4×4 space that leads into the master bedroom. It’s not much, but I pass by it more than any other area in my home on a daily basis.
Since I moved in, that “hallway” has been a work in progress. My friend Suzanne gave me the white table, and it happened to fit the space perfectly. I added a few knickknacks to the table and hung a blank frame as “filler” on the wall until inspiration struck.
Now, that “filler” has become the most versatile decoration in my home! It’s actually just a pre-made frame from Hobby Lobby that I had glass cut to fit, and I add a new masterpiece (created in Adobe Illustrator and printed at my local FedEx office) whenever I get the itch!
For “everyday” use, I enjoy a Randy Rogers Band quote from the song, “Let it Go”. It has sentimental meaning and keeps me grounded. For Halloween, I swap the frame to display my “If the broom fits, ride it” artwork. Over Christmas, I love seeing one of  my favorite holiday hymns, “Joy to the World” enlarged on the wall. Eventually, I plan to have a design for every occasion and season, and a few extras for in-between. Who knew there could be so much flexibility in one empty frame?
Over the past two years, the little table has collected a few more items- a wooden “violin”, a vintage leather jewelry box, and a Kodak Brownie Movie camera… along with more antique books (I can’t help but save them when I see them at estate sales). I never knew how much I could enjoy such a tiny corner of my home, but now that it’s a collection of items (and custom artwork) I love, it’s my very happy (small) space!

Mar 21, 2013
Last year, mom and I attended our first Fall RoundTop Antiques Fair just to “check it out”, but we were overwhelmed by the options – way too many great finds! After much restraint, we ended up only buying what would fit in the car (err, or on it)… And that’s how we drove home with a “chicken coop” tied to the top of the Jeep. We sure did get crazy looks from passing drivers!

Come to find out, what I was calling a “chicken coop”, is actually a “nesting box”, according to my friend Tony (who has chickens). Tomato, tom-ahto, either way- it’s super cool. I originally wanted it for the store – to display cute grab-and-go-gifts – but we never seemed to have the wall space, so it just collected dust in the back. This January, we did a major clean-out at the store, and I finally decided to bring it home. I wanted to hang it on my back porch, but upon closer examination, my granddad thought it was too heavy, so moved on to Plan B.

My granddad is a Jack of all Trades. He’s an 82 year old cotton farmer, mechanic, electrician, plumber, inventor, and overall “fixer”. I love his resourcefulness (he’s a little like MacGyver), and I appreciate his… precision. Let’s just say anything he’s ever fixed or made is going to last awhile. Probably forever. He’s very thorough, and he likes things to be sturdy – like the swing set he made when we were kids with tractor plow bases (buried 6 feet in the ground). That sucker’s not going anywhere!

Once we decided that the nesting box was too heavy to hang, I sketched out a plan for my granddad to build a”stand” for it. He welded iron for the frame, and I couldn’t be more pleased with how it turned out. I made a quick trip to his barn to pick out what material I wanted for the shelf (wood or metal), and he finished it up for me. It’s PERFECT!

This past weekend we secured the box by anchoring it to the brick wall (just in case), and then I completed the look by potting some trailing plants and colorful flowers to place in the openings and on the bottom shelf.

This project was more of an “accidental” re-purpose, since my original vision for the nesting box changed from displaying store products to becoming a planter… but the finished product is even better than I imagined! It’s an unusual display and perfect for my patio! Ta-da… the nesting box has been re-purposed, and I can’t wait to enjoy it!

What have you re-purposed lately?

Feb 13, 2013
 If you need a last-minute Valentine’s Day idea, I’ve got one that is fairly easy but will be a big hit your sweetheart! I did this for a boyfriend in high school (ah, young love), but back then I didn’t think to take photos (silly me) so I’ve recreated the idea for you.
What you’ll need:
A roll of CAUTION tape (I got mine at a local hardware store for $8)
painter’s tape ( or any tape that’s easily removable and safe for walls)
scissors
a black marker or pen
at least 2 dozen helium-filled balloons – you should be able to get these at your local grocery store or florist (I got a combination of foil hearts and regular latex in red, white and pink)
red construction paper cut into large hearts (I made a FREE DOWNLOAD if you want to use that)
A sign for the door (either handmade or THIS FREE ONE I created)
1. To begin, cut strips of the CAUTION tape, each just over a yard long (or long enough to wrap around one side of the door). Secure the strips on the front side of the door, by wrapping around the edge and taping. I did a criss-cross of tape for interest, but you can cover the entire door if you want – have fun with it! Print out (or hand write) a sign that says, “CAUTION: This room has suffered a severe heart attack” and tape it to the door.
2. Cut out the heart shapes and using the marker or pen, write why you love your sweetie. If you use the FREE DOWNLOAD, you can just fill in the specifics. If you make your own, you can also include favorite quotes, stories or whatever you like! It’s good to mention their features, personality, favorite times together, etc. (this is a list of what you love about them so you’ll want to make it good). Roll strips of the painter’s tape, affix to the back of the hearts and place around the room on the walls, furniture… anywhere and everywhere!

3. Release the balloons and let them rise to the ceiling, then individually move them around to cover the room more evenly.
4. Close the door and wait for your lovey to be surprised (and delighted by your thoughtfulness)!
By the way, I think this idea would be great for decorating an office too – and really for any special couples’ occasion – anniversary, wedding suite, or just because!
What do you think? Would you do this for your sweetheart? Happy “Heart Attack”ing!!!

Feb 3, 2013
I’ve always been been fascinated with interesting doors and windows – particularly antique ones. In fact, for years (and in two different homes), I’ve had old windows mounted to the wall for decoration. My dad refers to them as “windows to nowhere” – he thinks they’re pretty silly – but I don’t care because they make me happy!
Mounting vintage windows (and doors) is actually pretty easy, if you have the right tools and a little help. For this installment, my mother was kind enough to assist. It’s a lot easier with two people, but if you have to go it alone, you can (I’ve done it before). If you’re interested in hanging your own antique window “art”, you will need the following:
– a stud finder (I have a Zircon and I love it because it’s really easy to use!)
– painter’s tape
– a pencil
– a drill with 7/64″ drill bit
– a Phillips head screwdriver
– Corner Braces (I used 4 per window – mine were 1-1/2 inches x 5/8 inch)
– wood screws – 1 inch long (just make sure they are they same width as the ones included in the Corner Brace packages)
– windows to hang, glass cleaned beforehand (also make sure that there are no jagged or loose panes of glass that could be dangerous)
Steps
1. Use a stud finder to indicate where the studs are on the wall. I used a small piece of the painter’s tape to quickly mark the location of each stud.
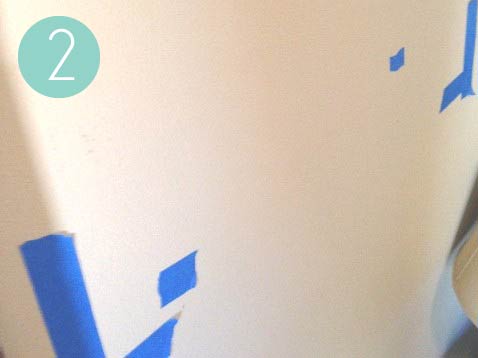
 2. Ask your assistant to hold up each window, roughly where you would like it to hang. Take a step back and see if it appears straight on the wall. If it looks correct to your eye, most likely it will be. Mark the corners with painter’s tape and use a pencil to mark the bottom edge of the window on the wall, as close to the stud as possible (by eye-balling your “stud marker” tape).
 3. Use the stud finder to verify that your pencil mark are indeed on a stud, then use the drill to get your first hold started. You don’t have to go all the way through, you just want the drilled hole to “guide” the screw in straight for the next step.
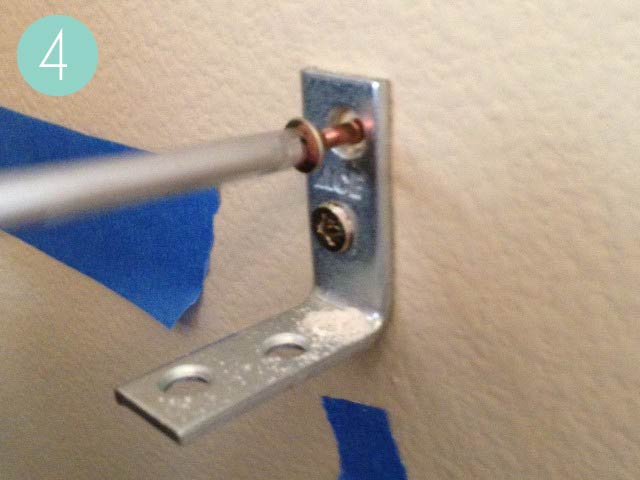
 4. Place the corner brace as shown (prepared to serve as a bottom bracket for your window), with hole you just drilled centered in the bottom hole on the brace. With the brace in place, mark the location of the top hole with a pencil Then use the drill the repeat step 3 for the second hole. Using the wood screws, not the screws included with the corner brace, use the screwdriver and tighten the brace to the wall (trying to keep it level).
 5. Using your pre-taped guides for corners and your secured corner braces (as a “placement shelf”), reposition the window. Using the stud finder again, verify where you will need the top braces, and just like Steps 3 and 4, secure the brace to the wall on each side. Once the window is finally positioned, use the drill to “start” the hole you will be screwing in on the top on each side of the brace. You could probably use both holes, but mine was plenty secure with just using the outer-most one.
 6. Next, use the smaller screws included in the corner brace kit and the screwdriver to secure the window on the top. Repeat this process on the bottom with the braces that the window is resting on. Repeat these steps for each window you want to hang.
Here’s the end result in my guest room:

Hanging these three windows only took about an hour and half with the help of my mom. What do you think?
Sep 26, 2010
Halloween isn’t always just about the kiddos! What could be more fun than throwing a small dinner party for your girlfriends – a Ghoul’s Night In, perhaps? This is a glimpse of my very first Ghoul’s Night In, when I was still living in Dallas. I hope it gives you a few ideas for your next Halloween Party!
The centerpiece for this table is simple, but with the addition of colorful stemware, a few candles, a decorative menu and place card/party favor, this party is frighteningly simple and fun!

One of my favorite details from this Halloween tablescape is the Witch’s Paper Shoe. Not only does it serve as a place card, but it’s a fun party favor too (the stocking is filled with candy). This paper shoe project is from a Papercrafts magazine several years ago. {To download the shoe template,
click here.} Adorned with a grosgrain ribbon and small silver buckle, these shoes are simply adorable – your girlfriends will love them!

And for the menu?

To Start – Pumpkin Gut Soup (a delicious Pumpkin Soup recipe from the
Walkerswood Caribbean Kitchen Cookbook)
Main Course – Scream Beans, Scalped and Mashed Potatoes, and Grilled Legs (chicken legs with dry rub of course!)
For Dessert – Coffin Cake (coffee cake) with “Eye Scream” and Blood Sauce (Raspberry topping)
You can even keep drinks for the party in-theme with Vampire Vineyards wine and martinis made from Blavod (black vodka) with “eyeballs” (pearl onions).

 Just a few of these details are sure to make for a spooktacular evening!


 And for the menu?
 To Start – Pumpkin Gut Soup (a delicious Pumpkin Soup recipe from the Walkerswood Caribbean Kitchen Cookbook)

 Just a few of these details are sure to make for a spooktacular evening!