
Oct 30, 2016
One of my favorite ways to display paper goods is with clothes pins on chicken wire – it’s just so easy and if there are “gaps” between items, you can see through it, so it feels light and airy. We use this display method for Bridal Shows, and it’s worked so well, we now use it for several products. I thought this concept would be perfect for displaying our custom recipe cards in the kitchen section. Since a few customers have asked how we made the display, I wanted to document it here. It’s surprisingly easy!
To make your own Chicken Wire Frame, you’ll need the following:
- a wooden frame (new or used), no glass or backing
- roll of chicken wire
- wire cutters
- staple gun and staples
- picture hangers
- paint
- sandpaper
Here’s how to make your own Chicken Wire Frame:
Use the sandpaper to sand your wooden frame. Be sure to get the corners well and wipe it down with a lightly damp cloth to get rid of any sanding dust.

Spray paint the frame your desired color, using several LIGHT layers of paint (so you have no runs!).
Tip: I use disposable table cloths as drop cloths when I spray paint – they’re only about $2 at the grocery store, large, and fantastically disposable.

Gather your roll of chicken wire and wire cutters. You’ll want to know approximately how much you’ll be using, so you can roll it out to the approximate width and cut the wire (so you’re not dealing with that huge roll the entire time).

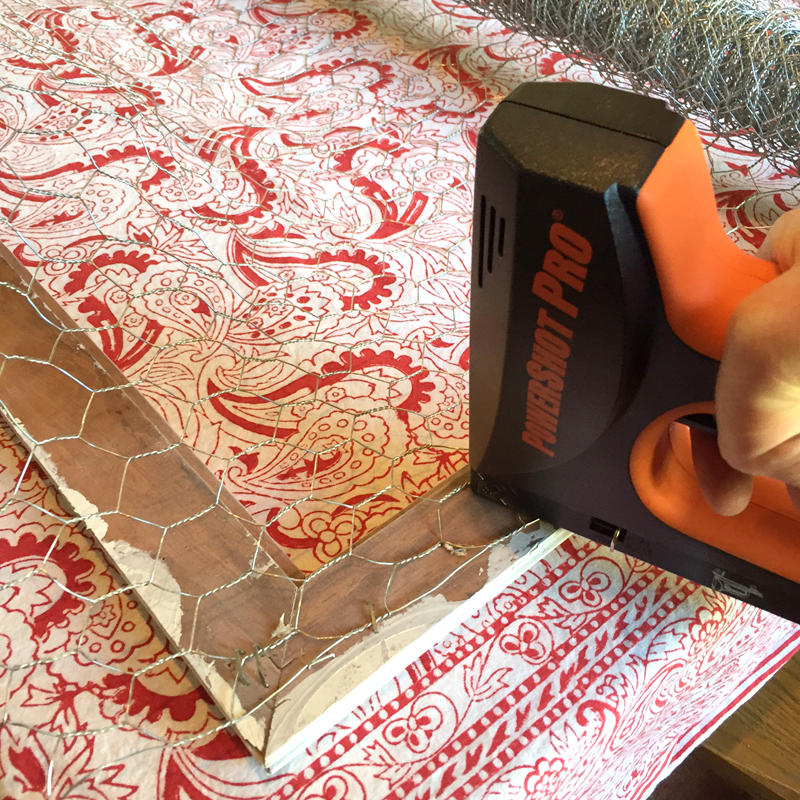
Using the edge of the frame as your guide, start to staple to chicken wire, starting from one side and going to the other. You can also staple along the top and bottom, making sure the wire is taught all the way around.

Once the wire is secure to the frame, use wire cutters to trim the edges, so they don’t extend beyond the wooden frame (but still are outside of the staples).

This is what the finished product will look like fro the front. 🙂

Use a screwdriver to add a “picture frame” hook to the back of the frame.

Hang and enjoy being able to add photos, invitations, or other paper goods to your chicken wire frame!

Sep 19, 2016
This summer was unusually WET for West Texas, and I mortified to discover my porch rug looking pretty green and mildew-y. Instead of throwing it away, I decided to try to clean it instead. It was successful, so I thought I would document it here for future reference. See the sad state it was in? Green and gross! Yuck.
 The supplies needed:
- one bottle of Lysol concentrate (I knew it would kill 99.9% of germs, but I wasn’t sure if it would discolor the rug – luckily it didn’t!)
- a scrubbing brush
- a bucket
- water hose with spray nozzle
- a open area with plenty of draining and sunlight (I used the street in front of my house, but a driveway would have been more ideal for drainage purposes)
 Follow package directions for diluting the Lysol in a bucket (and add a splash more for good measure). Then pour over the rug and let it sit for about 5 minutes. Repeat the process again, this time working in quarters of the rug to make sure you get the entire area.
 Use the scrubbing brush to work in small sections and brush away the mildew and stains.
 Once you have the entire rug scrubbed down, use the water hose to rinse it off. At this point, I used the brush to help push away excess water to the edges of the rug. As you rinse, you might also notice trouble spots that need additional attention.
 When you’re done, let the sunshine do its job to aid in the drying process! Or you can sling it over a fence or railing to make the excess water run off faster.
Ta-da!! Looks like a brand new rug! Clean and ready for all of my Fall weather porch sitting.


Aug 18, 2016
This past weekend the Barque team said “aloha” (goodbye) to summer AND “aloha” (hello) to a great fall ahead! It was the second annual End of Summer Party for us, and it really was a lot of fun. For me, it’s a wonderful way to connect with my team on a social level, and it’s also the perfect opportunity to incorporate products that we sell in a “real life” setting so my gals can see how people use our stuff outside of the store.
 A colorful chalkboard sign on the front door was a great way to welcome the girls – and check out the FAB lettering skills of our very own @kelseylainee (go find her out on Instagram now)!
Once they walked through the door, the girls were greeted by our store mannequin, Manny, dressed in a sarong and coconut bra with plastic leis. Quite festive.
 This casual soiree incorporated a lot of color, from the DIY Tassel Garland to the painted pineapples… and everything in between…
 Including a little island flair on the bar cart… (key limes, a painted pineapple, tropical postcards, tiny drink umbrellas and more plastic leis)
 Of course I had custom beverage napkins made, and I decided to spruce up some gold striped paper straws with cupcake liners to make them look more floral – aren’t they fun? The used this tutorial.

 The idea of adding edible flowers to the drink bucket was an inspiration from Pinterest – it added great color and made it more festive!
 Now isn’t that the prettiest drink you’ve ever seen?
As a centerpiece for the table, I used a combination of painted pineapples, fresh palm leaves from my local florist, coconut bowls with greenery, plastic leis and drink umbrellas.
 We were lucky enough to have Kelsey also hand paint our place cards too – aren’t they perfect? LOVING the hombre effect, and it was fun that everyone’s name was different!
 For the meal – which might be my favorite part of the entire evening – I created a menu using recipes out of cookbooks that we carry in the store. It gives all of us the chance to try something new, and it gives my team the opportunity to experience some of the selections we offer our customers – even if they don’t cook much themselves! This year’s selections came from four books – Lighten Up Ya’ll, Southern Cooking Family Style, Up South, and Boozy Shakes…

 Menu cards were made using the same pineapple icon as the beverage napkins, because making coordinating party elements is what we DO!
TO START
watermelon bites + lime salt*
grilled shrimp skewers
SOUPS + SALAD
peach + tomato gazpacho ( for the record, this was my favorite dish, but it wasn’t a crowd favorite)
kale + dandelion + orange salad
MAIN
bbq pulled pork tacos + cilantro cabbage slaw* (using Kelle B BBQ Sauce, recipe coming soon)
DESSERT
key lime pie boozy milkshakes*
*these were the crowd faves!


 For party favors, I had custom koozies and gift tags made. Paired with some personalized folded notes and fruity candy, they made a pretty nice and colorful take away.
 All in all, it was a great time, and it only makes me excited about the year we have ahead with this team. ALOHA to a great year ahead, ladies!
#teambarque
{if you want to check out my inspiration for the party, take a look at this Pinterest Board for more ideas}

Aug 16, 2016
For our Barque Team Dinner this summer, I had decided on a tropical theme, so I knew that PINEAPPLES would be the way to go for decorations.
Ultimately I decided that painting only the tops would be easiest – and since I had less than a week to plan the entire party and menu – that sounded like a good plan.
If you’re going to paint your own pineapples like I did, you’ll need:
- pineapples with pretty crowns (that’s the green part on top) – not too bent or torn up
- cans of colorful spray paint
- a few plastic tablecloths ( I got mine from the Dollar store)
 First, spread out the tablecloth on a table or flat surface, leaving enough room to cover for overspray at the top but plenty of extra tablecloth on the bottom.
 Place the pineapple on the tablecloth.
 Bring up the loose tablecloth from the bottom to cover the base of the pineapple. Just tuck it in and carefully wrap it around the sides so it’s nice and snug and protected from the paint.
 Lightly spray the crown of the pineapple with your desired paint color. If you’re going for an hombre effect, use the lighter color first. Be sure to move quickly and make several passes at different angles. You’ll also want to make sure you get it from the “top” angle…
 You can let it dry and then do the other side, or gently roll the pineapple over inside it’s little tablecloth to get to the opposite side to pain – totally depends on how much time or patience you have to sit and wait for paint to dry. ( I had none.)
 After you have your base coat, use a darker color in the same color scheme (or a coordinating color) to lightly spray just the edges of the crown. You don’t want too much paint or it will cover up your first coat – you just want enough to give the color a little depth.
Untuck the pineapple from the tablecloth and allow it to dry completely. Then marvel at your handiwork.
 (colors shown in this photo from left to right: yellow + orange, hot pink + red, aqua + royal blue, orange + pink)
These colorful and festive pineapples make a great centerpiece together or a fun addition to a bar cart or entry table. They’re perfect for a tropical soiree – and they’re so darn easy, they’ll probably become your go-to summer party decoration.

May 15, 2016
For Shannon’s garden-themed bridal shower, the floral arrangements were one of my favorite details, so I thought I would share a few tips for creating your own.
To start, you’ll want plenty of fresh flowers in the color scheme of your choice. I got these beauties from Box of Rain – a fun mix of roses, lilies, hydrangeas and greenery.
 You’ll also need some gorgeous root vegetables for color like these – carrots, turnips, radishes, artichokes, asparagus, brussels sprouts, etc. – whatever looks beautiful at your grocery will be stunning in this arrangement. You can also throw in a few different types of greens like kale, Swiss chard or collard greens – a variety of textures will really look nice.
You’ll also need wooden kabab sticks and a good pair of heavy duty scissors to cut them to your desired length.
First, wash and dry all of the veggies.
 You’ll also need a pre-made Oasis “caged foam base” from your local florist or craft store. I cut a hole in the bottom of the plastic on mine so I could insert the carrots from below and leave room for the flowers on top. Before you get started arranging, be sure to soak the Oasis foam until it’s nice and absorbed.
Start by gathering the carrots by their stems and tying them about 1-2 inches above the tops with either twine or wire. You want it to be tight so you can strip off the ends of the stems and they will still stay bundled together. Place the carrot bundle in your desired glass vase and fill with water. From the top, insert a wooden skewer into the carrot bundle. You want it to stick up a little so that you can secure it in the foam.

After cutting a hole in the oasis cage, you should be able to set it on top of the carrot bundle/skewer.
 I secured mine in place with a little duct tape (only because I was out of floral tape), but don’t worry – you won’t be able to see it once the arrangement is complete.
Start with the larger flowers cutting their stems on the diagonal as you insert them into the Oasis foam, then slowly go back and fill in the vegetables, using the sharp end of the skewer to pierce the “base” of the vegetable and cutting the length of the skewer to fit as needed. Keep adding flowers, vegetables and greenery – regularly turning the arrangement so you can make sure it’s even all the way around. (Don’t forget to add a little more water once you’re done – you don’t want those flowers to wilt!)
 When you’re finished, you’ll have this fun and unique floral arrangement that’s perfect for showers, garden parties, an elegant summer dinner or Easter lunch!
For more photos of arrangements like this, see the full post about Shannon’s Shower here.
Save

Jan 9, 2016
To get your pup red carpet ready, you will need:
– a white button-up shirt (I got mine in the Men’s section at Goodwill for $3 – just make sure the neck opening is clsoe to your dog’s neck size)
– scissors
– stapler
– black permanent marker
– bow tie with elastic (from a party store for just a few bucks)

Use the scissors to cut the collar and cuffs off the sleeves.

Then use the cuff to test the size of your dog’s “wrist”(make sure it’s still large enough to slide over their paw), folding it over and then removing it from your dog. Staple the cuffs in place, being sure to staple from the INSIDE so the sharp part of the staple will point away from your dog.

Take a permanent marker and color in the buttons.

Wrap the bow tie around the neck of the collar with the elastic on the inner crease, so the collar flap folds over it. Gently place the collar on your dog’s neck. DO NOT button the collar – you want it to fit loosely around their neck (and the elastic should hold it in place anyway).

Linus didn’t mind trying his on one bit. Ha!

Once you’re ready, slide the cuffs over the front paws. Then take a picture (or 83, if you so choose) of your dapper pup.


