Feb 23, 2013
One of my favorite go-to side dishes on a weeknight is roasted cauliflower. It’s just a few ingredients, it doesn’t take long, and it’s delicious {really, even kids that don’t like cauliflower like this recipe}. Try it and see what you think – I think it’s the perfect combination of hearty veggie, garlic, salt… and just a touch of heat – a combination that equals a side of yummy goodness!
Roasted Cauliflower
1 head cauliflower, cleaned and cut into bite-sized florets
2-4 cloves of garlic, minced (depending on how much you like garlic)
extra virgin olive oil, approx. 4 T.
red pepper flakes to taste
kosher salt to taste
Pre-heat the oven to 400 degrees. Line a glass baking dish with foil (to make clean-up extra easy). Put the cauliflower pieces in the dish (saving the clean-up of another mixing bowl) and drizzle with olive oil, approximately 4 tablespoons. Sprinkle with salt and red pepper flakes, add minced garlic and toss the cauliflower until it is well-coated with oil and seasoning (adding more oil if necessary to coat).
Pop into the oven and roast for approximately 25-30 minutes or until the cauliflower is a nice golden brown.
Doesn’t that sound easy? It’s a great veggie to prep, put in the oven, and continue cooking your main course while the cauliflower roasts to perfection.

I hope you like this side as much as I do!

Feb 13, 2013
 If you need a last-minute Valentine’s Day idea, I’ve got one that is fairly easy but will be a big hit your sweetheart! I did this for a boyfriend in high school (ah, young love), but back then I didn’t think to take photos (silly me) so I’ve recreated the idea for you.
What you’ll need:
A roll of CAUTION tape (I got mine at a local hardware store for $8)
painter’s tape ( or any tape that’s easily removable and safe for walls)
scissors
a black marker or pen
at least 2 dozen helium-filled balloons – you should be able to get these at your local grocery store or florist (I got a combination of foil hearts and regular latex in red, white and pink)
red construction paper cut into large hearts (I made a FREE DOWNLOAD if you want to use that)
A sign for the door (either handmade or THIS FREE ONE I created)
1. To begin, cut strips of the CAUTION tape, each just over a yard long (or long enough to wrap around one side of the door). Secure the strips on the front side of the door, by wrapping around the edge and taping. I did a criss-cross of tape for interest, but you can cover the entire door if you want – have fun with it! Print out (or hand write) a sign that says, “CAUTION: This room has suffered a severe heart attack” and tape it to the door.
2. Cut out the heart shapes and using the marker or pen, write why you love your sweetie. If you use the FREE DOWNLOAD, you can just fill in the specifics. If you make your own, you can also include favorite quotes, stories or whatever you like! It’s good to mention their features, personality, favorite times together, etc. (this is a list of what you love about them so you’ll want to make it good). Roll strips of the painter’s tape, affix to the back of the hearts and place around the room on the walls, furniture… anywhere and everywhere!

3. Release the balloons and let them rise to the ceiling, then individually move them around to cover the room more evenly.
4. Close the door and wait for your lovey to be surprised (and delighted by your thoughtfulness)!
By the way, I think this idea would be great for decorating an office too – and really for any special couples’ occasion – anniversary, wedding suite, or just because!
What do you think? Would you do this for your sweetheart? Happy “Heart Attack”ing!!!

Feb 8, 2013
Yesterday I shared an unexpected Pinterest moment- with two electricians installing a new light fixture in my kitchen. I know it sounds odd, but it was fun.
I’ve had a new light fixture for my kitchen sitting in the garage for at least 6 months – putting off installation because a) I didn’t want to take time off for an electrician to come and b) hire a contractor to patch the ceiling afterwards
Well, I finally bit the bullet this week.
When the electricians started the installation, I had an idea {light bulb moment if you will}. Instead of paying the contractor to patch the ceiling, I could cover the gap with some sort of object. I’ve seen “medallions” at Home Depot, but that’s not really my style. I needed something thin but large enough to cover the hole – like a book cover!
When I told them my idea, the electricians gave me a funny look… but when I came back with some glue, I noticed both of them snapping pics with their phones. They looked a little embarrassed until I grabbed my phone and took some too. Then they didn’t bother hiding their excitement about the unique challenge. They just kept saying back and forth, “Yeah, I think this could work.” (nodding) It made me laugh when one of them said, “My girlfriend will just kill me if I don’t take photos of this. She has me doing Pinterest projects just about every weekend.” {atta girl}
 First, I removed the cover from an old book (it was coming apart anyway), then I glued it to some scrap cardboard and trimmed the excess away with scissors.
 One of the guys used a utility knife to cut the shape of the electrical box out of the middle (so it would be flush with the ceiling). When hanging the fixture, they positioned the book to cover the gap and it was perfect! In fact, I think the blue/gray color of the cover beautifully matched the finish of the fixture – success!
 Looks like a little creativity and resourcefulness saved me over $100 on patching the ceiling, gave the fixture a unique look AND it was really fun! As a bonus, the electricians gave me a 10% discount on their labor cost (because I think they rather enjoyed the project too).
What do you think? Have you ever used anything unconventional to solve a problem in your decor?

Feb 3, 2013
 Please don’t judge how terrible my guest room was before. I knew it was bad. When I moved in two years ago, it was runner-up for LAST thing on the list of projects for the new house, and I just kept ignoring it.
I just recently decided it was time for a change!

Ok, ok, fine. That’s not entirely true.
THIS is the real reason for the sudden change. (see above photo for WHY). ——->
More specifically, what she did to my coverlet in the guest room was the deciding factor. Once it was sufficiently destroyed for no apparent reason (I promise, she’s a good dog and generally not a chewer), I thought it was at least time for new bedding… But new the new bedding project turned into re-arranging the room, and re-arranging the room just turned into a little bit more of a makeover than I had planned on! I didn’t do anything major – mostly just moving around existing items and adding a few new pieces to the mix, so I wouldn’t really call it renovation… but I will say the transformation is huge – and I love the result! I posted the window hanging DIY as a different post, which you can see here. Here are a few pics of the AFTER (my favorite detail is the last one):


Don’t you just love the embroidered sheets? I saw something similar to this idea in a magazine about 10 years ago and kept the clipping… I’ve been dying to do this for the longest time!
Here’s the rundown on the old/new (for anyone who is curious):
OLD- Antique windows (from a garage sale), draperies, shimmer accent pillow, taller black lamp and shade, black photo frame (moved from my bedroom), brass headboard (hard to see in the pics), side tables (used to have in the living room, had forever), vintage glass milk jar, silver coasters from Anthropologie (a gift), antique dresser with mirror (confiscated from mom’s house years ago), vintage books (I’m a bit of an addict, so I have a ton), the furry llama (one of my favorite random items in my house), chevron frame (thanks to my friend Linda, still needs a photo), guitar in the corner by the dresser – you can’t see (from college, still never learned to play).
NEW – Turquoise glass lamp with burlap shade (TJ Maxx find), birdie accent pillow (TJ Maxx), Blue chevron shams and duvet cover (Urban Outfitters), palm potted plant (Lowe’s), flat screen television (I’ve asked for one 2 Christmases in a row to no avail – so I bought myself one at a Pawn Shop… felt SO rebelious!), white sheets (Tuesday Morning)- monogrammed with my custom idea, new down comforter and queen mattress pillowtop (Bed Bath & Bey0nd), down pillow- specifically for my momma (Overstock.com), hydrangeas (from my florist friend, just because I love them so much).
So what do you think? Do you like the change?

Feb 3, 2013
I’ve always been been fascinated with interesting doors and windows – particularly antique ones. In fact, for years (and in two different homes), I’ve had old windows mounted to the wall for decoration. My dad refers to them as “windows to nowhere” – he thinks they’re pretty silly – but I don’t care because they make me happy!
Mounting vintage windows (and doors) is actually pretty easy, if you have the right tools and a little help. For this installment, my mother was kind enough to assist. It’s a lot easier with two people, but if you have to go it alone, you can (I’ve done it before). If you’re interested in hanging your own antique window “art”, you will need the following:
– a stud finder (I have a Zircon and I love it because it’s really easy to use!)
– painter’s tape
– a pencil
– a drill with 7/64″ drill bit
– a Phillips head screwdriver
– Corner Braces (I used 4 per window – mine were 1-1/2 inches x 5/8 inch)
– wood screws – 1 inch long (just make sure they are they same width as the ones included in the Corner Brace packages)
– windows to hang, glass cleaned beforehand (also make sure that there are no jagged or loose panes of glass that could be dangerous)
Steps
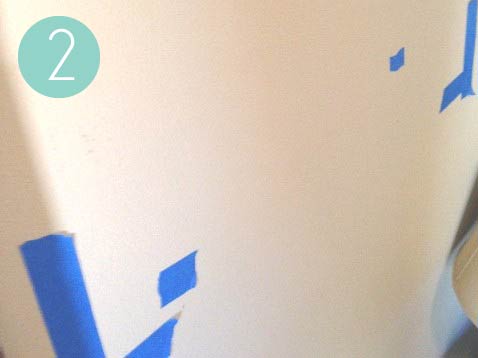
1. Use a stud finder to indicate where the studs are on the wall. I used a small piece of the painter’s tape to quickly mark the location of each stud.
 2. Ask your assistant to hold up each window, roughly where you would like it to hang. Take a step back and see if it appears straight on the wall. If it looks correct to your eye, most likely it will be. Mark the corners with painter’s tape and use a pencil to mark the bottom edge of the window on the wall, as close to the stud as possible (by eye-balling your “stud marker” tape).
 3. Use the stud finder to verify that your pencil mark are indeed on a stud, then use the drill to get your first hold started. You don’t have to go all the way through, you just want the drilled hole to “guide” the screw in straight for the next step.
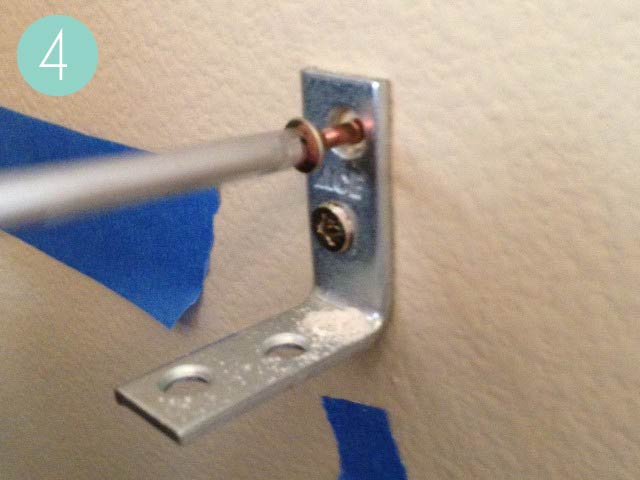
 4. Place the corner brace as shown (prepared to serve as a bottom bracket for your window), with hole you just drilled centered in the bottom hole on the brace. With the brace in place, mark the location of the top hole with a pencil Then use the drill the repeat step 3 for the second hole. Using the wood screws, not the screws included with the corner brace, use the screwdriver and tighten the brace to the wall (trying to keep it level).
 5. Using your pre-taped guides for corners and your secured corner braces (as a “placement shelf”), reposition the window. Using the stud finder again, verify where you will need the top braces, and just like Steps 3 and 4, secure the brace to the wall on each side. Once the window is finally positioned, use the drill to “start” the hole you will be screwing in on the top on each side of the brace. You could probably use both holes, but mine was plenty secure with just using the outer-most one.
 6. Next, use the smaller screws included in the corner brace kit and the screwdriver to secure the window on the top. Repeat this process on the bottom with the braces that the window is resting on. Repeat these steps for each window you want to hang.
Here’s the end result in my guest room:

Hanging these three windows only took about an hour and half with the help of my mom. What do you think?