Mar 9, 2014
When it comes to brunch, one of my favorite go-to recipes is a version of one I saw in a cooking magazine few years ago. They called it “Breakfast in Bread” but I like to call them Egg Nests. When I have company coming, it’s one of the easiest dishes to make, but it’s always a crowd-pleaser (gotta love that)!
Today I had the pleasure of having brunch with my sweet friend Andrea, so this is what I made for us. It’s so easy, and that that means we get to spend more time catching up than I actually do cooking.
 Egg Nests
1 sheet frozen puff pastry, thawed
flour for dusting
2 -3 strips of bacon
1 1/2 c. shredded grueyere cheese
4 T. shredded parmesan cheese
4 large eggs
kosher salt and ground pepper
chopped chives
Preheat oven to 425. Line a baking sheet with parchment paper. Roll out the pastry sheet and cut into 4 inch squares. Fold and pinch edges to form four round shells. Lightly flour the parchment and place the tart shells on it. Prick the pastry shells with a fork. Bake until golden, approximately 8-10 minutes.
While the shells are baking, cook the bacon until crispy. Set aside to cool and then chop into small pieces or crumble.
Once the tart shells are golden, remove from the oven and let cool slightly on the baking sheet. If the center is puffy, deflate it by gently flattening with a fork.

Sprinkle evenly with both of the cheeses, then make a shallow well in the middle of each one. Carefully crack an egg in the center of each of shell. Season with salt and pepper, then top with chopped (or crumbled) bacon.

Return to the oven for 10-15 minutes until the egg whites are set (depending on how runny you want your eggs). I like my whites to be just a TOUCH jiggly, so the egg is runny. If you let the whites completely harden then you will have a soft or well done egg yolk.
Top with chopped chives and serve!
I love serving this with a side of Grapefruit & Blueberry Salad (and a couple more slices of bacon of course!)
Happy Sunday Brunch Day friends!
This recipe is modified from a version in Food Network Magazine’s April 2012 issue.

Mar 1, 2014
 I love brunch. I love the idea of sleeping in, taking time to prepare a meal for family or friends, sipping on a cocktail mid-morning (because that’s acceptable brunch behavior), and enjoying a tasty meal in my pajamas. Sounds like fun all-around!
If I have company for brunch, I love to set up a bloody mary bar (inspired by the Build Your Own Bloody Mary Bar at Ozona Grill ). The drink cart gets decked out with my favorite mary fixins and guests get to build their own version.
This weekend my friend Tony is in town, so we’re going to be enjoying a little “Bloody Sunday” morning tomorrow. If you want to play along and have your own, here are my suggestions for a Bloody Mary Bar must-haves:
an icing bucket (to keep the vodka cold)
vodka (I prefer Texas-made Tito’s)
bloody mary mix (get the plain, not spicy, so guests can add their desired level of spice) – If you’re feeling ambitious, I’ve heard that this homemade recipe is good, but I’ve never actually made it
ice
lemon or lime wedges
margarita salt (and yes, here I did use a juicer as a salt dish – it’s the perfect size!)
carrot sticks
celery
olives (black and green)
pickles
other pickled veggies (okra, corn, green beans, pearl onions – anything pickled is perfect!)
shrimp (I cook and refrigerate the night before so they’re ready to go)
candied bacon swizzle sticks (I adore these from The Gracious Girl, but I can never get mine to stay twirled as pretty as hers)
Worcestershire sauce
Tony Chachere’s Cajun seasoning
Tabasco hot sauce
cute paper straws (you can get them from my shop here)
funny cocktail napkins (because boring napkins just won’t do)
water (for re-hydrating… very necessary!)

Step 1, which I almost always forget because I’m so excited to start loading up my glass: Coat the rim of your glass with juice from the lemon or lime wedge.
Step 2: Liberally coat the rim of the glass in the salt.
Step 3: Add ice (not too much or you won’t have room for all the delicious fixins!).
Step 4: Add vodka, then bloody mary mix (until the glass is about 3/4 full – again, gotta leave a little room!).
Step 5: Add desired veggies, fixins and spices.
Step 6: Garnish with a cute paper straw, sip and enjoy!
What are your bloody mary must-haves? I’d love to hear!

Feb 21, 2014
Anyone who knows me knows that I’m not big on desserts. My brother got the sweet tooth in the family, and generally speaking, I’m disinterested in dessert period. I don’t even eat cake at weddings – it’ doesn’t tempt me one iota. So you can imagine my surprise when I fell in love with this Rum Cake recipe that I got from a precious store customer over Christmas. It was delicious, so I asked her to share the recipe, and now I’m passing it along to you guys. It’s simple and tasty (two of my favorite food descriptions)!
Disclaimer: If this recipe belongs to you or someone you know, please let me know and I will happily give them credit for it. For all I know, it could be in a Betty Crocker cookbook! ha. Until proven otherwise, it’s a delicious mystery. Thanks for the cake (and the recipe), Caroline!

Rum Cake
1-2 cups chopped pecans, bits or halves
1 Duncan Hines French Vanilla cake mix
1 small vanilla INSTANT pudding mix
4 eggs
1/2 cup water
1/2 cup vegetable oil
1 1/4 cup dark rum, divided (I used Meyers’s)
1 cup (or a bit more) Bakers Fine Sugar
1 stick salted butter
Preheat oven to 350 degrees.

Spray a bundt pan with Baker’s Joy (or you can grease the pan and coat in flour like I did)
Assemble the pecans in the bottom of the pan.
In a bowl, mix the cake mix, instant pudding mix, eggs, water, oil and 1/2 cup dark rum until smooth. Pour into the bundt pan over the pecans. Bake cake through, 40-50 minutes (or until a knife comes out clean).

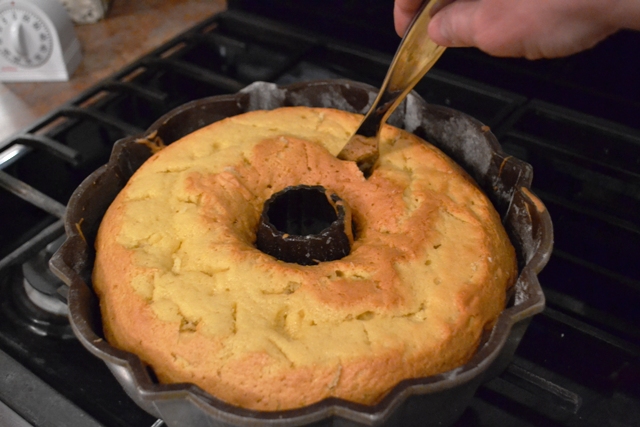
When done, remove from the oven and “stab with a knife about 20 times.” (I put this part in quotes because that’s what her email actually said and it’s my favorite part. ha!)
 In a sauce pan, mix the sugar, 3/4 cup dark rum and stick of butter. Bring to a boil and then pour over the cake while it’s still in the bundt pan.
 Let sit for 20 minutes. Remove the cake from the pan. Best left in the refrigerator for a day or in the freezer. Will keep up to six months in the freezer (but be sure to keep it wrapped up tightly).
When you’re ready, slice and enjoy! It’s definitely “rummy”, but I think it’s delicious (and super easy)!
Enjoy!

Feb 18, 2014
When I saw this idea featured in Country Living magazine last year, I thought it looked like a pretty fun (and clever) idea. It seemed easy enough (and 0h-so-cute), but I’m going to be honest: This little project was NOT as easy at it appeared. In fact, I think the CL article had it listed in just 3 or 4 steps… They conveniently forgot to talk to the person who actually did the cutting with the X-Acto knife about the extra step: Tending to your blistered fingers! Maybe it was just my unskilled X-Acto hands (I’m a little out of practice since college), but if you’re interested in doing this project, I thought I’d warn you up front.
If you still think this project looks fun, here ya go!

You will need:
Glue (I went old school Elmer’s)
Small foam brush
A book that’s thicker than your remote control
About 10 inches of grosgrain ribbon

1. Flip to the back of the book and generously apply glue on the back book cover. Using the foam brush, evenly spread the glue. Close the book to “paste” the last page to the back inside book cover.
 2. Holding the pages of the book together, add glue and use the foam brush to evenly coat the edges (all three sides).
 3. Open the front of the book and trace your remote’s outline with a pencil.

4. Using an X-acto knife, carefully cut away the pages of the book in the shape of the remote’s silhouette.

(repeat this process – for days if necessary – this part won’t be fun – just keep shaving away!)
 5. Using hot glue (or the Elmer’s), adhere the grosgrain ribbon to the base of the hollowed out space. This will help you “lift” the remote out of the hole you’ve dug for it.
 6. See how nicely it fits in the opening? This part was NOT easy… just keep testing the remote and carving more paper from the sides of the hollow space.
 There you have it… a hollowed out book to hide your remote! It was more work than I expected, but it was also kind of mindless to do while watching tv, and I like the end result!
Feb 12, 2014
When I worked for a wholesale invitation designer straight out of college, my first job was “customer service”. I answered phones, took orders, did data entry and the like… and I HATED it. I was pretty eager to move up on the ladder (even an inch) just so I wouldn’t have to take those customer service calls! Paper stores would call in, irritated that they hadn’t received their order or looking to track it down, or mad that the wrong thing arrived… It was horrible! I hated having to be the bearer of bad news (“sorry, it looks like it’s not going to arrive today as planned”) and talking to a bunch of stressed out, unhappy people all day. It made me hate dealing with people. In general. I was annoyed and really unhappy working in “customer service” for those few years.
Now I get it. I see the difference. Customer service on the wholesale end is MUCH different than in retail.
Over the past 5 years on the OTHER SIDE as a store owner, I’ve changed. I’ve gone from hating that aspect of my job in general to actually loving most of it. (The funny/sad truth is that customers who say “I must be a pain” are actually not! It’s the ones who have no clue they are that are the worst! It’s a little like When Harry Met Sally and he says, “You’re the worst kind; you’re high maintenance but you think you’re low maintenance.” ) HA.
There’s still a little bit of “when is my order arriving” and “what I received isn’t what I ordered”, but now I get to call the wholesaler and be that grumpy person trying to track it down (kidding)!
The upside is I get to see the smiling face of customers when they pick up their order. I get t0 hear, “Oh, this is just perfect, thank you so much!”, and I get to be a part of the lives of these people. You know, the fun stuff!
It’s such an honor.
If it’s important, it’s worth doing on paper, so that means I get to be a part of the milestones – moving, bridal showers, weddings, baby showers, anniversaries, birth announcements, christenings/baptisms, birthdays, proms, engagement parties… and then the circle starts all over again! It’s a beautiful thing to be a part of the most important moments in the lives of my customers. In fact, it’s a privilege. I never knew what that felt like until now, and it feels good!
I used to hate customer service, until I actually started serving CUSTOMERS (not just store representatives). When you’re directly involved with the end-user, there’s a certain level of pride that you take in your work. It’s a reward to help these loyal folks again and again, for any occasion that they’re celebrating.
I guess I used to hate customer service, but now I think I kind of like it.

 Egg Nests