
Sep 5, 2013
Fall is here! Well, technically it doesn’t feel like it yet since temps are in the 90’s, but the arrival of September means that at least it’s on the way! Fall is my favorite season – I love everything about it – the arrival of pumpkins, leaves changing color, hot apple cider, cozy scarves, and college football!
The first Texas Tech home football game is coming up, so I thought we would focus on a pre-game activity – Tailgating! If you’re a fan of the ultimate pastime of pre-gaming, then this easy DIY is right up your alley. It’s the perfect accessory for any tailgate (or football party in general) – an adorable turf runner.
Photo credit: Linda McMillan Photography
For this project, you will need:
6×8 astroturf rug  (I purchased mine at Home Depot – they have pre-cut ones in the outdoor department)
gloss white spray paint
packaged stencil set
a manila folder
scissors
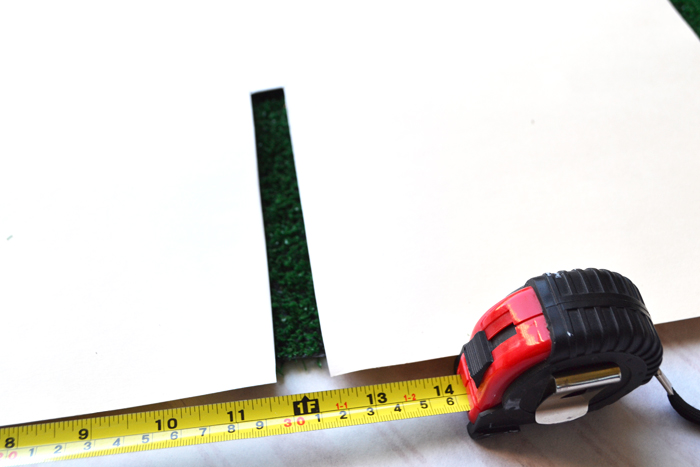
1. Measure your tailgate (or table that you plan to use the runner on). Cut the rug to the desired dimensions. I folded mine over to use the clean edge as my “straight edge” and I just cut along the fold.
2. Cut out a thin rectangle in the manila folder, approximately 1 inch x 6 inches. I used the fold of the folder as a guide so that at least one of my sides would be straight. 
3. Starting in the middle of the turf, position the manila folder at the bottom edge of the rug. (You may also want to protect the surface the rug is on with a plastic tarp or paper – I used some leftover wrapping paper.) Spray the paint to create a stripe.
 4. Repeat step 3 on either side of the first stripe, about 1 foot apart. I only painted the stripes on one side of my runner, but if you’re making it for a table or want the stripes and numbers on both sides, you’ll want to do all of the stripes at this stage.
5. Once you’re done creating the stripes, cut the manila folder in half. At this point we’re just recycling, so you always have the option of using another folder or piece of cardstock instead. Position the number stencil at the bottom edge of the folder and trace the outline. Remove the stencil and cut slightly INSIDE the outline.

6. Place the protecting folder and stencil next to your painted stripes – the 5, 4 or 3 on the left side and the 0 always on the right side – and spray the numbers. (If you need help, google search what a football field looks like so you can mimic it.)

7. Once the paint is dry, you have a festive addition to your Game Day Tailgate (or Table).

An easy addition to your football decor that adds a lot of flair? Touchdown!
Sep 4, 2013
I love the idea of having a “little something extra” to amp  up your decorative paper straws for any occasion… so why not a pennant for football season? It’s perfect for other sports themed events too- maybe a baseball baby shower or basketball birthday party? It’s kind of like a new twist on the classic, felt pennant on a wooden stick (except more cute and more useful)!
Today I’ve got a very special FREE printable to help you get into the school spirit this football season (courtesy of Calligraphy Etc.)!
It’s easy to do, and you’ll only need a few supplies:
a printer
colored paper
scissors
double -sided tape or glue
cute paper straws (you can get them here)
Ready to get to making adorable straw pennants?
1. Download the “GO FIGHT WIN” straw pennant sheet HERE.
2. Print it out on colored paper (to match your favorite sports team).
3. Carefully cut out the pennants on the dashed gray line.
4. Apply double sided tape to the back side of the pennant.
5. Approximately half an inch from the top of the straw, gently wrap a pennant it, being mindful to match up the pointed ends.
 Easy, right? It’s a quick way to add a little punch to your next Tailgate, Game Day party or sporting event refreshments!
Jul 22, 2013
 Although I *wish* I had a green thumb like my mother, I must admit that I’ve got a lot to learn… and one trick that my mom taught me early this summer is how to jumpstart seeds before I plant them in the garden.
For this “trick”, you’ll need a few Ziploc plastic bags, a Sharpie, packets of seeds you want to plant, and paper towels.
1. First, label the plastic bags with the names of the seeds you’ll be planting.
2. Slightly wet a paper towel and lay flat. Open the seeds from one seed packet and sprinkle them on the moistened paper towel. Fold up the paper towel and place it in the labeled plastic bag.
3. Repeat this step for each of the items you intend to plant.
4. After a few days, tear the paper towel into  pieces and then “plant” the torn pieces (with the seeds) in your garden. This is a heck of a lot easier than trying to plant ONE teeny-tiny seed in the ground, and in the end, they won’t all grow anyway.
See how the seeds will have already started to sprout, after just a few days in the plastic bag?


Jul 14, 2013
 A few years after college, my grandmother gave me a small clothing wardrobe (that she actually found it on the side of the road) . I’ve always loved the cabinet’s little frame, adorable skeleton key lock (but of course the key is missing), and its built-in shelving (on the right side). For me, it wasn’t much use as a wardrobe… so eventually I decided it would be the perfect bar cabinet! It’s beautiful, sentimental AND functional.
Originally, the cabinet was for clothes, hence the shelving. To create even more storage, I purchased an inexpensive wooden wine rack from World Market, screwed it into the back of the cabinet to make it secure, and then stained it to match. Then, I installed wine glass “runners” in the top of the cabinet. I use those to hold champagne glasses, with wine and martini glass storage on the built-in side shelves. The top of the wine rack also creates an instant shelf, so it’s perfect for more oddly-shaped bottles. I love how much storage this little cabinet has- with everything tucked away so neatly, it’s just perfect!

Do you have a “hidden” bar? Share your creative ideas, I’d love to hear!

May 1, 2013
 I found this “mailbox” lunch box at an antique store in town and instantly snapped it up… I especially love the “Mr. Zip” on the side (hehe). While I don’t take my lunch to work much these days, I did think that this could be the perfect vessel for housing outgoing mail…
  We often write “thank you” notes at work to customers, and having a way to organize them seems pretty perfect. I’m just excited that now I have a cute way to do it!
This adorable little mailbox only cost me $14 (but honestly I would have paid more). I completely love the graphics on it, as well as the overall design. With the “mailbox” look on both sides (including the flag), I think it’s a pretty special piece.
To act as a divider for the outgoing mail, I cut some kraft cardstock and added Avery tabs with the name of each month. I love that these tabs are self-adhesive and the title can be changed easily too! To keep with the colors of the box, I only used the red, white and blue options from the package, and I think it works well.
Here’s a shot of the inside, showing the monthly tabs and a few cards already filed in place.
My grandmother, who sent a birthday card to EVERYONE she knew (maybe that’s where a love of paper), taught me a pretty cool trick when I was in college. She used to label each envelope (in the top right corner) with the date that it should be mailed to get to the recipient ON their birthday. If all of the cards are filed away nicely, all you have to do is pull out the card to be mailed (on the date listed), place a stamp over the written date, and drop it in the mail!  Such a simple (but totally genius) idea that has stuck with me for YEARS… It’s been really helpful!
I’m so excited to have this little treasure as my “mail organizer”. It’s WAY better than a boring office filing system, don’t you think? 🙂 Happy mailings, all!


Apr 14, 2013
 I admit, I have a favorite corner of the house… Ok, technically it’s a hallway (a teeny tiny one). It’s the 4×4 space that leads into the master bedroom. It’s not much, but I pass by it more than any other area in my home on a daily basis.
Since I moved in, that “hallway” has been a work in progress. My friend Suzanne gave me the white table, and it happened to fit the space perfectly. I added a few knickknacks to the table and hung a blank frame as “filler” on the wall until inspiration struck.
Now, that “filler” has become the most versatile decoration in my home! It’s actually just a pre-made frame from Hobby Lobby that I had glass cut to fit, and I add a new masterpiece (created in Adobe Illustrator and printed at my local FedEx office) whenever I get the itch!
For “everyday” use, I enjoy a Randy Rogers Band quote from the song, “Let it Go”. It has sentimental meaning and keeps me grounded. For Halloween, I swap the frame to display my “If the broom fits, ride it” artwork. Over Christmas, I love seeing one of  my favorite holiday hymns, “Joy to the World” enlarged on the wall. Eventually, I plan to have a design for every occasion and season, and a few extras for in-between. Who knew there could be so much flexibility in one empty frame?
Over the past two years, the little table has collected a few more items- a wooden “violin”, a vintage leather jewelry box, and a Kodak Brownie Movie camera… along with more antique books (I can’t help but save them when I see them at estate sales). I never knew how much I could enjoy such a tiny corner of my home, but now that it’s a collection of items (and custom artwork) I love, it’s my very happy (small) space!


 (I purchased mine at Home Depot – they have pre-cut ones in the outdoor department)
 4. Repeat step 3 on either side of the first stripe, about 1 foot apart. I only painted the stripes on one side of my runner, but if you’re making it for a table or want the stripes and numbers on both sides, you’ll want to do all of the stripes at this stage.


