Oct 13, 2014
I must admit, I’m a bit of a Fraidy Cat. I can’t watch horror movies {accidentally saw 5 minutes of Children of the Corn when I was a kid and it haunted me for years}, and I’ve never been to a haunted house {no thank you, very much}… but I do love decorating for Halloween {even if it is pretty PG13}!
I thought it might share few details of my “frightfully delightful” Halloween decor to proof it doesn’t ALL have to be blood and gore and scary to be fun!
My mantle display is similar to last year, but I decided to ditch the colorful banner and add a few more crows and cobwebs.


I also recreated the “mercury glass” mirror this year. The first time I did this project, I used single pane glass, which apparently wasn’t sturdy enough for the layers of paint I put on it (so it cracked – as you can see in the earlier photos). This time I opted for double pane glass, which was perfectly sturdy for the DIY Mercury Project.

By the front door, I have my “bucket-o-brooms” displayed (in a wire milk carton).

In the entryway, I decorate a glittery black tree with Halloween ornaments. {Don’t you love the vintage Jack-O-Lantern candy bucket?}
 I also framed a spooky “changing portrait” that I got from Haunted Memories { WARNING: Some of their portraits are super freaky, so proceed with caution. I tried to pick the most “tame” option I could find… because I’m a scaredy cat!}


I also love this little surface with a variety of Halloween {and everyday} items.

On the guest room door, I’ve hung a wreath that I made from old book pages and a styrofoam wreath form. This is a delicate decoration that requires extra TLC to maintain every year, but I still love it.

An extra section of garden fence, adorned with black feather boas and a few witch’s hats, serves as my “Hat Check”.

Here’s a closer look at the “Hat Check” tags – I saw these featured in a magazine several years ago, so I duplicated the idea {I’d be happy to give them credit for the idea, but I just can’t remember which magazine it was}.

Do you decorate for Halloween? Do you prefer bloody and horrific over PG/PG13? Let me know, I’m curious!

Oct 1, 2014
Do you need a cute, quick Halloween hostess gift (or something for a friend or neighbor)? This is the EASIEST idea (seriously, it takes less than 5 minutes). Just keep in mind to pick up a pair of striped children’s tights when you head to the costume store this month!
You will need:
– a bottle of wine (you can use any you have on hand, but if you want to do a Halloween themed variety like Vampire or Nevermore, that’s even more fun)
– a pair of child’s striped tights (any costume store should have them, I got this pair at Joann’s) *TIP: I like to buy these when I see them on sale and save them for the next year*
– a piece of ribbon, approximately 8 or 9 inches long
– scissors
– a gift tag (I used one we sell in the store, but you could also trim down a plain index card or cut a shaped tag out of cardstock)

First, open the tights and use the scissors to cut off each leg.

Then place the wine bottle inside the leg of the tights.

Tie ribbon around the neck of the bottle and affix the gift tag. Trim the tights approximately 1-2″ above the top of the bottle, and turn the ends under towards the inside (to make the edge look more finished).

Simply sign the tag and leave this on the porch of a friend or neighbor for a spooktacular surprise, or take this to a Halloween party as a hostess gift. It’s seriously cute and takes less than 5 minutes. Seriously. That’s my kind of project!


Mar 14, 2014
With St. Patty’s Day right around the corner, I thought it might be fun to help you get in the Spirit O’ the Irish! How about this straw idea for your St.Patty’s shindig this weekend? Kids and adults alike are sure to enjoy these!
Simply download the free printable (HERE), print on white cardstock, and glue them to any decorative straw (like these stripey ones).
Serve these in your favorite drinks this weekend and see how many “Irish Eyes are Smiling” in return!
Happy Early St. Patrick’s Day!

Mar 1, 2014
 I love brunch. I love the idea of sleeping in, taking time to prepare a meal for family or friends, sipping on a cocktail mid-morning (because that’s acceptable brunch behavior), and enjoying a tasty meal in my pajamas. Sounds like fun all-around!
If I have company for brunch, I love to set up a bloody mary bar (inspired by the Build Your Own Bloody Mary Bar at Ozona Grill ). The drink cart gets decked out with my favorite mary fixins and guests get to build their own version.
This weekend my friend Tony is in town, so we’re going to be enjoying a little “Bloody Sunday” morning tomorrow. If you want to play along and have your own, here are my suggestions for a Bloody Mary Bar must-haves:
an icing bucket (to keep the vodka cold)
vodka (I prefer Texas-made Tito’s)
bloody mary mix (get the plain, not spicy, so guests can add their desired level of spice) – If you’re feeling ambitious, I’ve heard that this homemade recipe is good, but I’ve never actually made it
ice
lemon or lime wedges
margarita salt (and yes, here I did use a juicer as a salt dish – it’s the perfect size!)
carrot sticks
celery
olives (black and green)
pickles
other pickled veggies (okra, corn, green beans, pearl onions – anything pickled is perfect!)
shrimp (I cook and refrigerate the night before so they’re ready to go)
candied bacon swizzle sticks (I adore these from The Gracious Girl, but I can never get mine to stay twirled as pretty as hers)
Worcestershire sauce
Tony Chachere’s Cajun seasoning
Tabasco hot sauce
cute paper straws (you can get them from my shop here)
funny cocktail napkins (because boring napkins just won’t do)
water (for re-hydrating… very necessary!)

Step 1, which I almost always forget because I’m so excited to start loading up my glass: Coat the rim of your glass with juice from the lemon or lime wedge.
Step 2: Liberally coat the rim of the glass in the salt.
Step 3: Add ice (not too much or you won’t have room for all the delicious fixins!).
Step 4: Add vodka, then bloody mary mix (until the glass is about 3/4 full – again, gotta leave a little room!).
Step 5: Add desired veggies, fixins and spices.
Step 6: Garnish with a cute paper straw, sip and enjoy!
What are your bloody mary must-haves? I’d love to hear!
Dec 25, 2013
 This holiday, I went with a slight variation of the centerpiece I used for Christmas dinner last year… I seem to keep getting stuck on using those gorgeous evergreens, hydrangeas (because I love them so much) and my “new” deer figurines. So sue me.
Luckily, this time I was able to incorporate an unique piece that my grandmother gave me this past weekend at family Christmas “on the farm” – a gingham enamelware coffee pot. It was just so cute with its wrap-around pattern and squatty body – I couldn’t resist! That baby became the center of my tablescape pretty much as soon as it was in my grubby little hands. I think it was just perfect, perched atop a sliced tree trunk, among boughs of fir and evergreen, adorned with antique glass ornaments and votive candles to complete the look.
I just love how it turned out so homey and personal (and even more importantly – SIMPLE)! Merry Christmas everyone!


Oct 29, 2013
Well, if you’ve been following along, you may have already seen some of the details from my #booksandbirds Spellbinding Halloween Party a few weeks ago. Here’s a quick recap in case you missed all of the little details! Basically, it was literary-themed Halloween book exchange – and lots of fun!

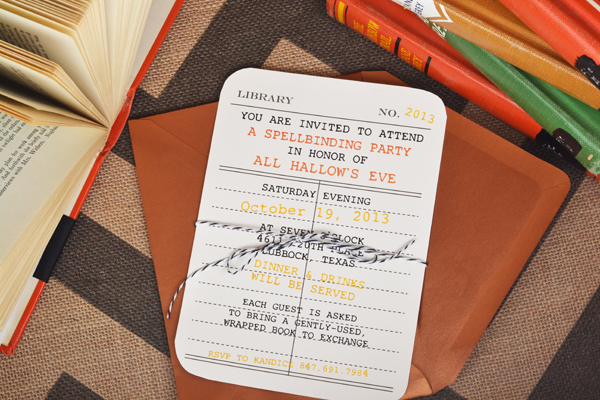
For the invitation, I originally saw something like this on Pinterest, but I decided to change up the colors to make it a little more Halloween-ish.
 Since I went with a #booksandbirds theme, of course I decorated the table with them! You can see the step-by-step here.
For the place cards/menu cards, books + a little craftiness seemed to fit the bill. More details on that and the menu here.

 A little peek of the drink cart, including the signature drink of the evening, Tequila Mockingbird. You can also get a free download of the drink definition straw flags here.

To round off the party, I’ve posted a Halloween Playlist here as well.
At the end of the evening, we did a book exchange (which provided WAY more laughter than I anticipated). And even though it was a very small group of girls, we had a fabulous time!

 I also framed a spooky “changing portrait” that I got from Haunted Memories { WARNING: Some of their portraits are super freaky, so proceed with caution. I tried to pick the most “tame” option I could find… because I’m a scaredy cat!}


