
Oct 30, 2016
One of my favorite ways to display paper goods is with clothes pins on chicken wire – it’s just so easy and if there are “gaps” between items, you can see through it, so it feels light and airy. We use this display method for Bridal Shows, and it’s worked so well, we now use it for several products. I thought this concept would be perfect for displaying our custom recipe cards in the kitchen section. Since a few customers have asked how we made the display, I wanted to document it here. It’s surprisingly easy!
To make your own Chicken Wire Frame, you’ll need the following:
- a wooden frame (new or used), no glass or backing
- roll of chicken wire
- wire cutters
- staple gun and staples
- picture hangers
- paint
- sandpaper
Here’s how to make your own Chicken Wire Frame:
Use the sandpaper to sand your wooden frame. Be sure to get the corners well and wipe it down with a lightly damp cloth to get rid of any sanding dust.

Spray paint the frame your desired color, using several LIGHT layers of paint (so you have no runs!).
Tip: I use disposable table cloths as drop cloths when I spray paint – they’re only about $2 at the grocery store, large, and fantastically disposable.

Gather your roll of chicken wire and wire cutters. You’ll want to know approximately how much you’ll be using, so you can roll it out to the approximate width and cut the wire (so you’re not dealing with that huge roll the entire time).

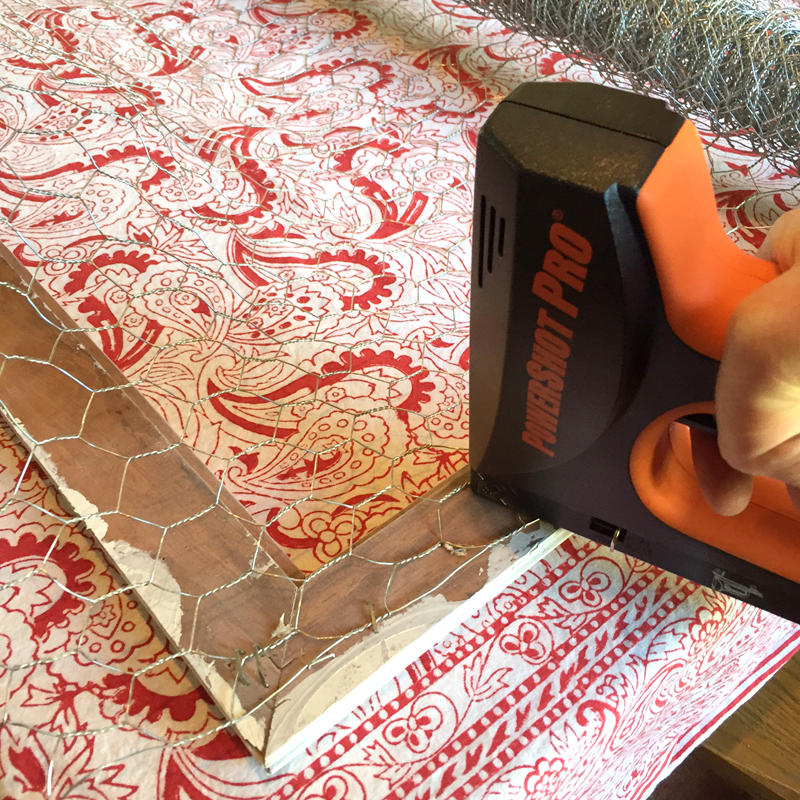
Using the edge of the frame as your guide, start to staple to chicken wire, starting from one side and going to the other. You can also staple along the top and bottom, making sure the wire is taught all the way around.

Once the wire is secure to the frame, use wire cutters to trim the edges, so they don’t extend beyond the wooden frame (but still are outside of the staples).

This is what the finished product will look like fro the front. 🙂

Use a screwdriver to add a “picture frame” hook to the back of the frame.

Hang and enjoy being able to add photos, invitations, or other paper goods to your chicken wire frame!

Sep 26, 2016
Decorating for Halloween is a highlight of the season – it means that fall is officially here and I can get geared up for my favorite season. I don’t do anything super scary or gruesome because… well, I’m a wimp and can’t take it. ha! (Truth is I’ve never even been in a haunted house because I’m certain it would give me a heart attack.) The past few years I’ve used books and birds to decorate, and this year I did the same – with a twist. To keep the color palette more neutral, I only used white pumpkins, and I turned the books around so the pages faced forward. The bird cage I use year-round but in another location and the “mirror” is one that I made look old in this DIY. A few cobwebs and plastic spiders complete the look.

 If I have a Halloween party, I hang the “Come In My Little Pretties” sign on the front door. And plug in the ampersand metal light.

 I use a garden gate panel in my hallway to create a witch hat rack. Several years ago, in a magazine (I can’t even remember which one), I had seen a “witch hat check” that featured tags on the hats – so I printed up some of my own.


 Happy Halloween!

Sep 14, 2016
Today we’re throwing it back to a style shoot we did four years ago. It was an election year, and the upcoming Presidential election was all over the media, so I was inspired to see how a wedding could have a political twist. After a few phone calls, I put together an amazing team to make it happen. From the “rustic Americana” wedding invitations to All-American mini pies in mason jars, we think the details of this event have the potential to sway the vote of any party enthusiast at heart!


 Our beautiful bride looks stunning…


 Doesn’t a Bi-Partisan Sparkler sound like the perfect signature cocktail for this soiree?

 Mason jar pies by Simply Decadent are SO perfect. Adorable (and delicious)!
 “Let’s get this party started!” napkins make a great touch – plus, guests can choose a side – which makes a great conversation starter.


 Look at that handsome, patriotic groom…
 Spirit Ranch is magical in the evenings… don’t you love this setting for a wedding?
 As part of “A Campaign for Happiness” – guests are asked to leave advice for the new Mr. & Mrs. in the “ballot box”
 Using this card with advice for each “side” as the couple serves a “lifelong term” together in wedded bliss…
 Escort cards with tiny campaign buttons make a fun display AND takeaway for the guests to wear as they storm the dance floor…
 LOVE the wording on this invitation. Love.


 Striking red peep toe pumps? Yes, please!
 Before the happy couple speeds away, a quick photo op. And a limo decked out – dignitary style.
Special thanks go out to the following for their tremendous help with making this style shoot come to life:
Spirit Ranch : Linda McMillan Photography : Simply Decadent Bakery : Puttin’ on the Ritz : First Class Tuxedo : Bella’s Bridal : Devault Floral : Gourmet Pantry : Emily Adams on Fire : Limousines of Lubbock : Haute Hair by Cristina : Host and Toast
If you want to see more, we were lucky enough to have the details of this style shoot featured here on Pizzazzerie.com

Sep 5, 2016
For our Aloha Team Dinner, I decided to keep the prep easy for BBQ Pulled Pork tacos by using a slow cooker, and this recipe turned out to be a keeper!
Slow Cooker BBQ Pulled Pork
Ingredients:
- 1 (3-4 lb.) boneless Boston butt pork roast
- 1 jar Kelle B Santa Fe Apple BBQ Sauce (we also sell this at Barque)
- 6 cloves of garlic, peeled and minced
- 1 white onion, coursely chopped
- 1 jalapeno, seeded and chopped
- 2 bell peppers, seeded and chopped into 1/2 inch slices
- 1 32 oz. container of low sodium chicken broth
- 2-3 cups of water
- chili powder
- cumin
- salt and pepper
Directions:

Remove the netting from the pork roast and generously rub it down with chili powder, cumin, salt and pepper on all sides. Place it in the slow cooker and add chopped onion, jalapeno, bell peppers and garlic.
 Pour BBQ sauce over the top, add chicken broth and water (enough to barely cover the top of the pork).

Cook on the high temperature setting for 2 hours, then reduce to low for 4-5 hours. If you’re not able to change the temperature, just cook it on low for 8-9 hours.
Warning: This pork will make your house smell AMAZING! 🙂
Once you’re ready to serve, remove the meat from the slow cooker and place it on a cutting board. Cut away the obvious fat, and shred the meat. If you want even more flavorful meat, retrieve some of the veggies from the pot, chop them up and add mix them into the meat before serving.

This pork is great for tacos, sandwiches, burritos… it’s very versatile. And for how easy it is, that’s a beautiful thing.

Aug 18, 2016
This past weekend the Barque team said “aloha” (goodbye) to summer AND “aloha” (hello) to a great fall ahead! It was the second annual End of Summer Party for us, and it really was a lot of fun. For me, it’s a wonderful way to connect with my team on a social level, and it’s also the perfect opportunity to incorporate products that we sell in a “real life” setting so my gals can see how people use our stuff outside of the store.
 A colorful chalkboard sign on the front door was a great way to welcome the girls – and check out the FAB lettering skills of our very own @kelseylainee (go find her out on Instagram now)!
Once they walked through the door, the girls were greeted by our store mannequin, Manny, dressed in a sarong and coconut bra with plastic leis. Quite festive.
 This casual soiree incorporated a lot of color, from the DIY Tassel Garland to the painted pineapples… and everything in between…
 Including a little island flair on the bar cart… (key limes, a painted pineapple, tropical postcards, tiny drink umbrellas and more plastic leis)
 Of course I had custom beverage napkins made, and I decided to spruce up some gold striped paper straws with cupcake liners to make them look more floral – aren’t they fun? The used this tutorial.

 The idea of adding edible flowers to the drink bucket was an inspiration from Pinterest – it added great color and made it more festive!
 Now isn’t that the prettiest drink you’ve ever seen?
As a centerpiece for the table, I used a combination of painted pineapples, fresh palm leaves from my local florist, coconut bowls with greenery, plastic leis and drink umbrellas.
 We were lucky enough to have Kelsey also hand paint our place cards too – aren’t they perfect? LOVING the hombre effect, and it was fun that everyone’s name was different!
 For the meal – which might be my favorite part of the entire evening – I created a menu using recipes out of cookbooks that we carry in the store. It gives all of us the chance to try something new, and it gives my team the opportunity to experience some of the selections we offer our customers – even if they don’t cook much themselves! This year’s selections came from four books – Lighten Up Ya’ll, Southern Cooking Family Style, Up South, and Boozy Shakes…

 Menu cards were made using the same pineapple icon as the beverage napkins, because making coordinating party elements is what we DO!
TO START
watermelon bites + lime salt*
grilled shrimp skewers
SOUPS + SALAD
peach + tomato gazpacho ( for the record, this was my favorite dish, but it wasn’t a crowd favorite)
kale + dandelion + orange salad
MAIN
bbq pulled pork tacos + cilantro cabbage slaw* (using Kelle B BBQ Sauce, recipe coming soon)
DESSERT
key lime pie boozy milkshakes*
*these were the crowd faves!


 For party favors, I had custom koozies and gift tags made. Paired with some personalized folded notes and fruity candy, they made a pretty nice and colorful take away.
 All in all, it was a great time, and it only makes me excited about the year we have ahead with this team. ALOHA to a great year ahead, ladies!
#teambarque
{if you want to check out my inspiration for the party, take a look at this Pinterest Board for more ideas}

Aug 16, 2016
For our Barque Team Dinner this summer, I had decided on a tropical theme, so I knew that PINEAPPLES would be the way to go for decorations.
Ultimately I decided that painting only the tops would be easiest – and since I had less than a week to plan the entire party and menu – that sounded like a good plan.
If you’re going to paint your own pineapples like I did, you’ll need:
- pineapples with pretty crowns (that’s the green part on top) – not too bent or torn up
- cans of colorful spray paint
- a few plastic tablecloths ( I got mine from the Dollar store)
 First, spread out the tablecloth on a table or flat surface, leaving enough room to cover for overspray at the top but plenty of extra tablecloth on the bottom.
 Place the pineapple on the tablecloth.
 Bring up the loose tablecloth from the bottom to cover the base of the pineapple. Just tuck it in and carefully wrap it around the sides so it’s nice and snug and protected from the paint.
 Lightly spray the crown of the pineapple with your desired paint color. If you’re going for an hombre effect, use the lighter color first. Be sure to move quickly and make several passes at different angles. You’ll also want to make sure you get it from the “top” angle…
 You can let it dry and then do the other side, or gently roll the pineapple over inside it’s little tablecloth to get to the opposite side to pain – totally depends on how much time or patience you have to sit and wait for paint to dry. ( I had none.)
 After you have your base coat, use a darker color in the same color scheme (or a coordinating color) to lightly spray just the edges of the crown. You don’t want too much paint or it will cover up your first coat – you just want enough to give the color a little depth.
Untuck the pineapple from the tablecloth and allow it to dry completely. Then marvel at your handiwork.
 (colors shown in this photo from left to right: yellow + orange, hot pink + red, aqua + royal blue, orange + pink)
These colorful and festive pineapples make a great centerpiece together or a fun addition to a bar cart or entry table. They’re perfect for a tropical soiree – and they’re so darn easy, they’ll probably become your go-to summer party decoration.

