
Aug 26, 2015
As I’m planning an End of Summer Fiesta, so I thought it might be fun to create decorative napkin rings for it. They were easy, and I like how they added more color to the tablescape.
To begin, you will need:
– scissors
– empty toilet paper rolls (or paper towel rolls)
– craft glue
– sheets of colored tissue paper

First, cut the empty toilet paper/paper towel cardboard tubes into rings approximately 2.5″ wide.
 Then fold them in half and use the scissors to cut “fringe” on one side – approximately 1/4″ between cuts.
 Next, use the glue (sparingly) to attach the tissue strips one at a time to the cardboard tube.
 Keep adding layers of tissue until the entire cardboard tube is covered (approximately 4 layers).
 After gluing, use your fingers to gently “rough up” the fringe a bit – I think it looks better that way.
 {As you can tell, I repeated the same process for the menu, using longer tissue strips.}

Jun 17, 2015
As spring shifts into high gear and Mother’s Day, Father’s Day and Graduation draw near, we need more room for greeting cards – we have cards out the wazoo!

To solve the problem, this weekend we put a little muscle into it and added two more sections of shelves to our greeting card corner.


The new section will be our “Featured” area – if you’ve seen a card posted somewhere on social media, this is where you can find it. Quickly and easily.
Now we can get out even more of the cards you need for this busy season of life!

Apr 20, 2015
For Earth Day this year, we wanted to do something really fun for our customers… so we’ve made wildflower seed bombs!
The idea is that you can use the seed bomb in your own yard (or toss out the window when driving down the highway) to magically add a little beauty to the world around you.
To make your own Earth Day wildflower seed bombs, you’ll need the following (yields 20):
8.5 x 11 blue cardstock – about 12 sheets
8.5 x 11 green cardstock – about 6 sheets
a blender
water
local wildflower seeds
a mesh strainer
To begin, tear the paper (or use a paper shredder if you have one) to make small pieces of each cardstock color. 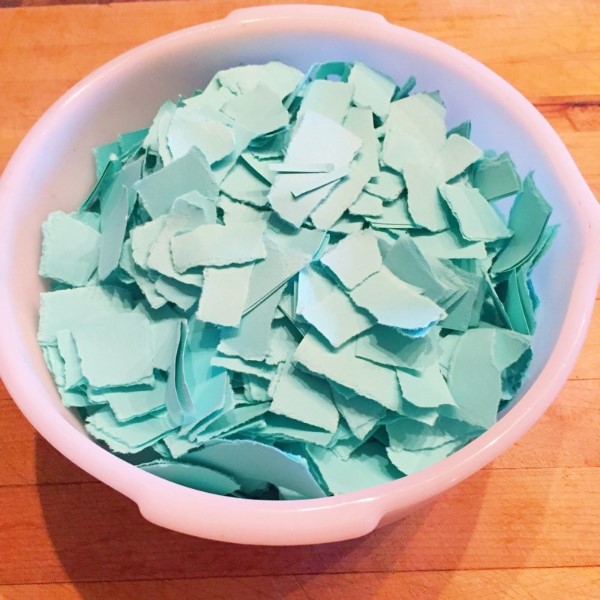
You can use any kind of paper (even newspaper), but I used an aquamarine colored cardstock, because I wanted it to look like a globe.
Add the paper shreds to a blender and cover with water. ** If you don’t have enough water, your paper won’t “pulp” – it’s always easier to drain the extra water than add it.
 Blend until the paper is a smooth consistency. Pour into a mesh strainer draped over a bowl (to drain the excess water).
 Use your hands to press the pulp until most of the moisture is strained.
 Repeat the same process for the green cardstock (which will serve as “land” on your Earth seed bombs later – so you’ll need far less)
 Once you have the paper pulp from each color completed, slowly add handfuls of wildflower seed until thoroughly mixed.
 I got my seeds from a local nursery, but you can find local wildflowers seeds online for your area by doing a search online.
 With the blue paper pulp/seed mixture create a small ball (squeezing the moisture out as you go).
 Add bits of the green seed mixture and reform in a sphere to create an “Earth” shape and look.
 Set aside each seed bomb on a cookie sheet to dry and repeat until all of the paper pulp is gone.
Drying update: If you need to speed up the drying process, turn a couple of fans on the seed bombs to help circulate air around them. Depending on their size, that should dry them in 6-12 hours.
We plan to give these out to the first 20 customers who come in on Earth Day (this Wednesday)… but think this would be a fun project for any family who wants to bring wildflowers to their community year-round!

Oct 13, 2014
I must admit, I’m a bit of a Fraidy Cat. I can’t watch horror movies {accidentally saw 5 minutes of Children of the Corn when I was a kid and it haunted me for years}, and I’ve never been to a haunted house {no thank you, very much}… but I do love decorating for Halloween {even if it is pretty PG13}!
I thought it might share few details of my “frightfully delightful” Halloween decor to proof it doesn’t ALL have to be blood and gore and scary to be fun!
My mantle display is similar to last year, but I decided to ditch the colorful banner and add a few more crows and cobwebs.


I also recreated the “mercury glass” mirror this year. The first time I did this project, I used single pane glass, which apparently wasn’t sturdy enough for the layers of paint I put on it (so it cracked – as you can see in the earlier photos). This time I opted for double pane glass, which was perfectly sturdy for the DIY Mercury Project.

By the front door, I have my “bucket-o-brooms” displayed (in a wire milk carton).

In the entryway, I decorate a glittery black tree with Halloween ornaments. {Don’t you love the vintage Jack-O-Lantern candy bucket?}
 I also framed a spooky “changing portrait” that I got from Haunted Memories { WARNING: Some of their portraits are super freaky, so proceed with caution. I tried to pick the most “tame” option I could find… because I’m a scaredy cat!}


I also love this little surface with a variety of Halloween {and everyday} items.

On the guest room door, I’ve hung a wreath that I made from old book pages and a styrofoam wreath form. This is a delicate decoration that requires extra TLC to maintain every year, but I still love it.

An extra section of garden fence, adorned with black feather boas and a few witch’s hats, serves as my “Hat Check”.

Here’s a closer look at the “Hat Check” tags – I saw these featured in a magazine several years ago, so I duplicated the idea {I’d be happy to give them credit for the idea, but I just can’t remember which magazine it was}.

Do you decorate for Halloween? Do you prefer bloody and horrific over PG/PG13? Let me know, I’m curious!

Oct 1, 2014
Do you need a cute, quick Halloween hostess gift (or something for a friend or neighbor)? This is the EASIEST idea (seriously, it takes less than 5 minutes). Just keep in mind to pick up a pair of striped children’s tights when you head to the costume store this month!
You will need:
– a bottle of wine (you can use any you have on hand, but if you want to do a Halloween themed variety like Vampire or Nevermore, that’s even more fun)
– a pair of child’s striped tights (any costume store should have them, I got this pair at Joann’s) *TIP: I like to buy these when I see them on sale and save them for the next year*
– a piece of ribbon, approximately 8 or 9 inches long
– scissors
– a gift tag (I used one we sell in the store, but you could also trim down a plain index card or cut a shaped tag out of cardstock)

First, open the tights and use the scissors to cut off each leg.

Then place the wine bottle inside the leg of the tights.

Tie ribbon around the neck of the bottle and affix the gift tag. Trim the tights approximately 1-2″ above the top of the bottle, and turn the ends under towards the inside (to make the edge look more finished).

Simply sign the tag and leave this on the porch of a friend or neighbor for a spooktacular surprise, or take this to a Halloween party as a hostess gift. It’s seriously cute and takes less than 5 minutes. Seriously. That’s my kind of project!


Jun 8, 2014
Last summer was my initial “investment” in the patio project. I didn’t want to spend a lot of money, but I knew that I had to start somewhere, so the World Market Outdoor Furniture Sale was my first stop. **TIP: Apparently they have this sale annually, mid-June to July, so if you plan ahead and watch for it, you can save BIG time. I just happened upon the sale last year and a sales associate told me their goal is to have everything cleared out by July 4th.**
I ended up choosing this Catalina Occasional Deep Bench (it’s seriously deep – probably twin bed size!), Occasional Chair, Coffee Table and Side Table. It took a little extra work to acquire the set (my local store didn’t have them all), but between my mom and I, we did it. And even better, everything was 50-75% off because they were on sale (and some were store displays)! {Retail value: $600, Actual cost: $250}
Next up, I ordered a rug from Target {approximately $70}

This summer I decided to add COLOR.
First I bought a slipcover for the bench and chair cushions (the day the went on sale because I was watching for the email)! Actually, I bought a few so I can change them out – red, turquoise and off white.

Then I mixed in a few colorful pillows and a lantern from Garden Ridge.
 Originally, I thought some flameless candles from there would work too… but they melted after about 10 minutes in the heat. So I went online and found these fab ones that are made specifically for the out of doors. I like that they flicker, have an optional timer, and their glow isn’t that fake bright orange.
 I planted a few new flowers {in existing pots}, added a Patio Egg to keep the mesquitoes away and… DONE!

I know it will probably always be a work in progress, but at least it’s cheerful and it’s a good start.
Cheers to prettying up the porch. Now I just need to have a porch party to break it in!
PS- If you like the succulent tower, I’ve got instructions for how to make one here.


 Then fold them in half and use the scissors to cut “fringe” on one side – approximately 1/4″ between cuts.
 Next, use the glue (sparingly) to attach the tissue strips one at a time to the cardboard tube.
 Keep adding layers of tissue until the entire cardboard tube is covered (approximately 4 layers).
 After gluing, use your fingers to gently “rough up” the fringe a bit – I think it looks better that way.
 {As you can tell, I repeated the same process for the menu, using longer tissue strips.}


