
Sep 5, 2013
Fall is here! Well, technically it doesn’t feel like it yet since temps are in the 90’s, but the arrival of September means that at least it’s on the way! Fall is my favorite season – I love everything about it – the arrival of pumpkins, leaves changing color, hot apple cider, cozy scarves, and college football!
The first Texas Tech home football game is coming up, so I thought we would focus on a pre-game activity – Tailgating! If you’re a fan of the ultimate pastime of pre-gaming, then this easy DIY is right up your alley. It’s the perfect accessory for any tailgate (or football party in general) – an adorable turf runner.
Photo credit: Linda McMillan Photography
For this project, you will need:
6×8 astroturf rug  (I purchased mine at Home Depot – they have pre-cut ones in the outdoor department)
gloss white spray paint
packaged stencil set
a manila folder
scissors
1. Measure your tailgate (or table that you plan to use the runner on). Cut the rug to the desired dimensions. I folded mine over to use the clean edge as my “straight edge” and I just cut along the fold.
2. Cut out a thin rectangle in the manila folder, approximately 1 inch x 6 inches. I used the fold of the folder as a guide so that at least one of my sides would be straight. 
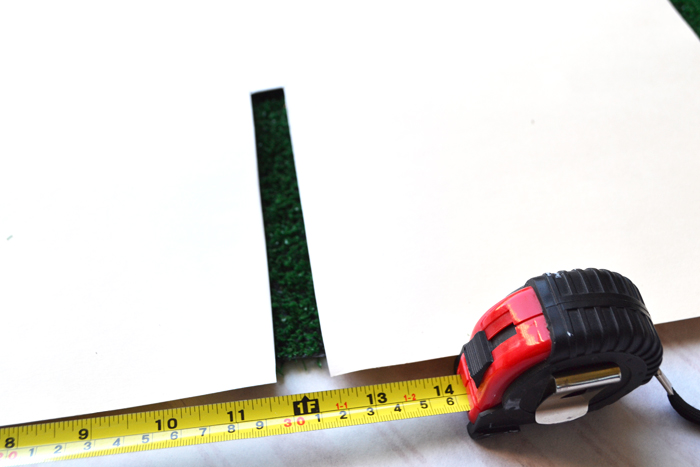
3. Starting in the middle of the turf, position the manila folder at the bottom edge of the rug. (You may also want to protect the surface the rug is on with a plastic tarp or paper – I used some leftover wrapping paper.) Spray the paint to create a stripe.
 4. Repeat step 3 on either side of the first stripe, about 1 foot apart. I only painted the stripes on one side of my runner, but if you’re making it for a table or want the stripes and numbers on both sides, you’ll want to do all of the stripes at this stage.
5. Once you’re done creating the stripes, cut the manila folder in half. At this point we’re just recycling, so you always have the option of using another folder or piece of cardstock instead. Position the number stencil at the bottom edge of the folder and trace the outline. Remove the stencil and cut slightly INSIDE the outline.

6. Place the protecting folder and stencil next to your painted stripes – the 5, 4 or 3 on the left side and the 0 always on the right side – and spray the numbers. (If you need help, google search what a football field looks like so you can mimic it.)

7. Once the paint is dry, you have a festive addition to your Game Day Tailgate (or Table).

An easy addition to your football decor that adds a lot of flair? Touchdown!

Mar 17, 2013
Easter is almost here, and this fun, last-minute project was inspired by these burlap bunny napkin rings I saw at Pier 1. With just a few supplies from the local craft store, this project was up and running in no time! It’s really easy to do, and I think this could be a fun project for the kiddos (with an adult to help with the scissors).

DIY Bunny Napkin Rings
For this project you’ll need:
8.5 x 11 sheets of white felt
8.5 x 11 sheets of pink felt
Felt glue
1 inch white pom poms
.5 inch pink pom poms
.2 black pom poms (or small wiggle eyes if you prefer)
Sticky Back VELCRO squares (I used 7/8 inch)
Scissors
Directions:
– On the short side of the felt sheet, use the scissors to cut a strip of white felt approximately 2 inches wide.
– Then cut approximately 1 inch off the end (unless you have really fat napkins)
– Fold the longer piece (now 2 x7 inches) in half
– Fold over the end approximately 1/4 inch. Use the scissors to cut a slit in the folded over part. When you unfold the felt strip, there should be two small holes


– Fold over a white felt piece and cut “ears” in the length you desire
– Using the white “ears” as a guide, cut the same size piece out of the pink felt (folded)
– Trim the pink felt a little on all sides so it’s no longer joined in the middle AND so there’s white on all edges (NOT SHOWN)
– Thread one white “ear” through one slit of the felt strip
– Do the same with the other ear and adjust as needed to make even
– Using felt glue, attach the pink felt pieces to the white “ears”


– Use the glue to attach a large white pom in the back (for the tail), a medium pink pom (for the nose) and two small black poms (or wiggle eyes- for the eyes)
Side note: This would be really cute if you wanted to make bunnies with different colors – just make the pom color for the nose match the felt! Wouldn’t it be fun in different colors around the kids’ table? Red, green, blue, orange?
– Affix one side of the VELCRO sticky back squares to one side of the felt strip
– Roll the felt strip (as it were wrapped around a napkin) and affix the other VELCRO piece
– Wrap around your napkins and set at each place setting. Since the ears are pliable, you can also position them in different ways – something unique for every guest!
Easter table decorations? Check! Now to decide on the menu…
Happy early Easter!

Feb 13, 2013
 If you need a last-minute Valentine’s Day idea, I’ve got one that is fairly easy but will be a big hit your sweetheart! I did this for a boyfriend in high school (ah, young love), but back then I didn’t think to take photos (silly me) so I’ve recreated the idea for you.
What you’ll need:
A roll of CAUTION tape (I got mine at a local hardware store for $8)
painter’s tape ( or any tape that’s easily removable and safe for walls)
scissors
a black marker or pen
at least 2 dozen helium-filled balloons – you should be able to get these at your local grocery store or florist (I got a combination of foil hearts and regular latex in red, white and pink)
red construction paper cut into large hearts (I made a FREE DOWNLOAD if you want to use that)
A sign for the door (either handmade or THIS FREE ONE I created)
1. To begin, cut strips of the CAUTION tape, each just over a yard long (or long enough to wrap around one side of the door). Secure the strips on the front side of the door, by wrapping around the edge and taping. I did a criss-cross of tape for interest, but you can cover the entire door if you want – have fun with it! Print out (or hand write) a sign that says, “CAUTION: This room has suffered a severe heart attack” and tape it to the door.
2. Cut out the heart shapes and using the marker or pen, write why you love your sweetie. If you use the FREE DOWNLOAD, you can just fill in the specifics. If you make your own, you can also include favorite quotes, stories or whatever you like! It’s good to mention their features, personality, favorite times together, etc. (this is a list of what you love about them so you’ll want to make it good). Roll strips of the painter’s tape, affix to the back of the hearts and place around the room on the walls, furniture… anywhere and everywhere!

3. Release the balloons and let them rise to the ceiling, then individually move them around to cover the room more evenly.
4. Close the door and wait for your lovey to be surprised (and delighted by your thoughtfulness)!
By the way, I think this idea would be great for decorating an office too – and really for any special couples’ occasion – anniversary, wedding suite, or just because!
What do you think? Would you do this for your sweetheart? Happy “Heart Attack”ing!!!

Jan 4, 2013
 Every Christmas, I try to do a different theme for the dinner table, and this time I really wanted something “woodsy”… So I purchased some a moss runner from Joann’s, added a low vase with white hydrangeas (wrapped in moss “ribbon”), a few white pillar candles, evergreen branches, Christmas tree slices (*see note below), and an amazing vintage set of deer figurines that I bought off of etsy.
I used a white tablecloth as a base, layered with a white lace tablecloth to give the table a little more texture. Then I used extra “tree slices” to write the names of my dinner guests, sort of like a rustic place card. The overall look was simple but really nice, I was pleased and my family was pretty impressed! Not a bad deal for possibly the easiest centerpiece ever!
Do you do the same centerpiece every year or do you try different themes too? I would love to hear about them/see your ideas!
* For the Christmas tree “slices”, I asked my local Lowes if I could grab a few out of their discard pile when I got my Christmas tree cut. They gave them to me for free, and I was able to get a variety of sizes, just perfect for giving height to the pillar candles and fun place cards for my guests!
Oct 25, 2011
Ghoul’s Night IN is one of my favorite Halloween Party themes. In fact, I throw one almost every year for my girlfriends. It gives me a great chance to hang out with my girl (and really, it’s good excuse to put together a themed evening). This particular party has some of my favorite details ever – including the “medical record/x-ray” invitation and the “shocktail” station.

The invitation, mailed in a manila envelope, is a fun play on a medical examiner’s record. I printed the x-ray of a skull on vellum and attached to the “Medical Record” with a paper clip. The medical record reveals all of the party details: Patient admitted, date of admittance, cause of death – too much fun of course!, time of death (party starts at), attire, evidence is conclusive of – dinner, dessert, fun, libations (all of the above), name of responsible party, contact address, and emergency contact to notify (or to RSVP).

A simple floral arrangement in a plastic cauldron makes for a nice centerpiece.

For the table, each place setting is framed with a black paper shoe (originally in PaperCrafts magazine in October 2005, you can download the template here). The shoe is garnished with a striped stocking filled with candy and a personalized tag. Such an easy (and fun) place setting idea – that doubles as a party favor too!

A cocktail cart is a great way to get any party in gear – it gets people involved! Guests are given the opportunity to mix their own “shocktail” – in this case, with Black Vodka (Blavod), while they mix and mingle.

I love using dry ice to make the “potion” come alive…

The evening’s cocktail options included a Black Widow (ice + cranberry juice + black vodka), Bad Moon Rising (truffle + black vodka), and Olive You to Death (a traditional martini with olives + black vodka). Cute paper straws with “Drink Me” flags complete the look.

Appetizers included Mini Caramel Apples, Horsey Shrimp Cups, “Choke” Dip with Salty Bones and Spicy Meatballs.


For dinner, guests were served “Heart” (of Palm) Salad, Pumpkin Gut Soup, Grill (Chicken) Legs, Scream Beans, Stuffed Shells and “Coffin” Cake with “Eye Scream”

As a party favor, guests took home “Spiderwebs on a Stick” (white cotton candy wrapped around a rock candy stick and garnished with a tag and spider ring).

All in all, a SPOOKtacular evening!
Sep 26, 2010
Halloween isn’t always just about the kiddos! What could be more fun than throwing a small dinner party for your girlfriends – a Ghoul’s Night In, perhaps? This is a glimpse of my very first Ghoul’s Night In, when I was still living in Dallas. I hope it gives you a few ideas for your next Halloween Party!
The centerpiece for this table is simple, but with the addition of colorful stemware, a few candles, a decorative menu and place card/party favor, this party is frighteningly simple and fun!

One of my favorite details from this Halloween tablescape is the Witch’s Paper Shoe. Not only does it serve as a place card, but it’s a fun party favor too (the stocking is filled with candy). This paper shoe project is from a Papercrafts magazine several years ago. {To download the shoe template,
click here.} Adorned with a grosgrain ribbon and small silver buckle, these shoes are simply adorable – your girlfriends will love them!

And for the menu?

To Start – Pumpkin Gut Soup (a delicious Pumpkin Soup recipe from the
Walkerswood Caribbean Kitchen Cookbook)
Main Course – Scream Beans, Scalped and Mashed Potatoes, and Grilled Legs (chicken legs with dry rub of course!)
For Dessert – Coffin Cake (coffee cake) with “Eye Scream” and Blood Sauce (Raspberry topping)
You can even keep drinks for the party in-theme with Vampire Vineyards wine and martinis made from Blavod (black vodka) with “eyeballs” (pearl onions).

 Just a few of these details are sure to make for a spooktacular evening!


 And for the menu?
 To Start – Pumpkin Gut Soup (a delicious Pumpkin Soup recipe from the Walkerswood Caribbean Kitchen Cookbook)

 Just a few of these details are sure to make for a spooktacular evening!