Nov 9, 2016
I love designing custom invitations for our customers’ events, but when they give me complete creative freedom, it’s a lot more fun.
I was recently challenged with creating a custom invitation for a Christmas Coffee. Off the top of my head, I suggested a Nutcracker and stacked teacups, and my customer immediately said, “go for it”, so I did! This design was really fun to make, and I’m really pleased with how it turned out. It’s fun, colorful and very cheerful (as a party invitation should be).
From time to time I share a behind-the-scenes look at my design process, and since this design is becoming a favorite so far this year, I thought I’d share more. Take a look at the photo below. Does he look familiar? The inspiration for my Nutcracker on paper came from one my own collection. This guy is one of my faves – I call him Señor Nutcracker.

Until a few years ago, I thought Nutcrackers were creepy, but then I stumbled upon a handful of them at am Estate Sale. For some reason, I felt compelled to “save” them, and since then, they’re some of my favorite holiday finds.
After I created the Nutcracker and Cups invitation, I went a little “Nutcracker crazy” (hey, if inspiration strikes, you go with it). I wondered how it would look to have a Nutcracker invade a “Christmas Fiesta” invitation… so I designed two more ideas. Aren’t they fun?! We now have two options for your next Mexican-themed Holiday party – a custom design that takes about a week AND an off-the-shelf design that takes 2-3 days to print. Either way, it will put your guests in the mood for mistletoe and maracas! Ole!

And then I just kept going and created this custom gift tag…

Ok, ok, I’m stopping!!!! (PS- this gift tag is a sneak peek. More details on our NEW custom gift tags coming soon!)

Oct 30, 2016
One of my favorite ways to display paper goods is with clothes pins on chicken wire – it’s just so easy and if there are “gaps” between items, you can see through it, so it feels light and airy. We use this display method for Bridal Shows, and it’s worked so well, we now use it for several products. I thought this concept would be perfect for displaying our custom recipe cards in the kitchen section. Since a few customers have asked how we made the display, I wanted to document it here. It’s surprisingly easy!
To make your own Chicken Wire Frame, you’ll need the following:
- a wooden frame (new or used), no glass or backing
- roll of chicken wire
- wire cutters
- staple gun and staples
- picture hangers
- paint
- sandpaper
Here’s how to make your own Chicken Wire Frame:
Use the sandpaper to sand your wooden frame. Be sure to get the corners well and wipe it down with a lightly damp cloth to get rid of any sanding dust.

Spray paint the frame your desired color, using several LIGHT layers of paint (so you have no runs!).
Tip: I use disposable table cloths as drop cloths when I spray paint – they’re only about $2 at the grocery store, large, and fantastically disposable.

Gather your roll of chicken wire and wire cutters. You’ll want to know approximately how much you’ll be using, so you can roll it out to the approximate width and cut the wire (so you’re not dealing with that huge roll the entire time).


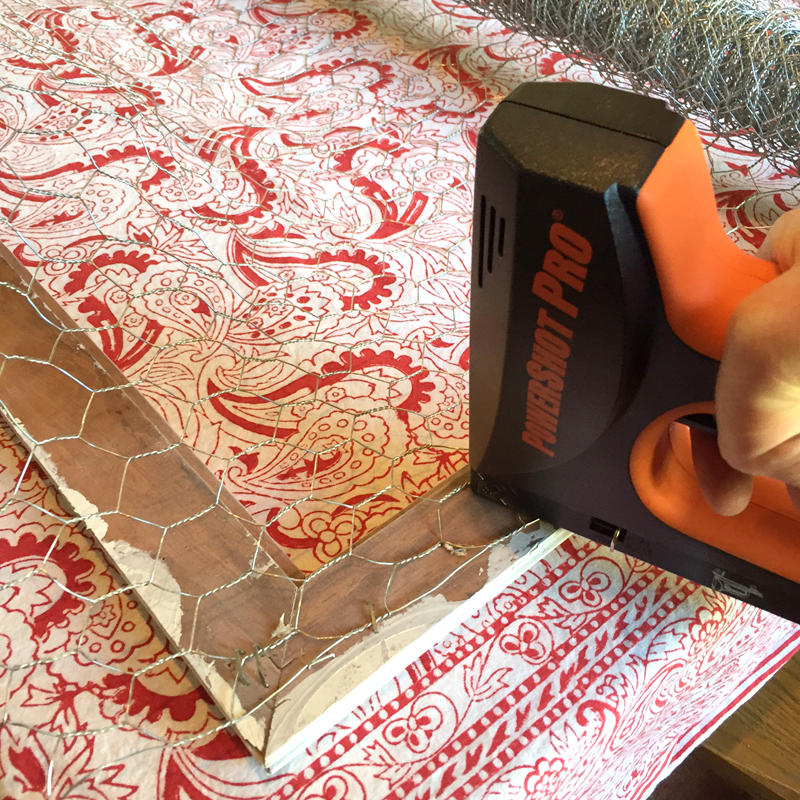
Using the edge of the frame as your guide, start to staple to chicken wire, starting from one side and going to the other. You can also staple along the top and bottom, making sure the wire is taught all the way around.

Once the wire is secure to the frame, use wire cutters to trim the edges, so they don’t extend beyond the wooden frame (but still are outside of the staples).

This is what the finished product will look like fro the front. 🙂

Use a screwdriver to add a “picture frame” hook to the back of the frame.

Hang and enjoy being able to add photos, invitations, or other paper goods to your chicken wire frame!

Sep 26, 2016
Decorating for Halloween is a highlight of the season – it means that fall is officially here and I can get geared up for my favorite season. I don’t do anything super scary or gruesome because… well, I’m a wimp and can’t take it. ha! (Truth is I’ve never even been in a haunted house because I’m certain it would give me a heart attack.) The past few years I’ve used books and birds to decorate, and this year I did the same – with a twist. To keep the color palette more neutral, I only used white pumpkins, and I turned the books around so the pages faced forward. The bird cage I use year-round but in another location and the “mirror” is one that I made look old in this DIY. A few cobwebs and plastic spiders complete the look.

 If I have a Halloween party, I hang the “Come In My Little Pretties” sign on the front door. And plug in the ampersand metal light.

 I use a garden gate panel in my hallway to create a witch hat rack. Several years ago, in a magazine (I can’t even remember which one), I had seen a “witch hat check” that featured tags on the hats – so I printed up some of my own.


 Happy Halloween!

Sep 19, 2016
This summer was unusually WET for West Texas, and I mortified to discover my porch rug looking pretty green and mildew-y. Instead of throwing it away, I decided to try to clean it instead. It was successful, so I thought I would document it here for future reference. See the sad state it was in? Green and gross! Yuck.
 The supplies needed:
- one bottle of Lysol concentrate (I knew it would kill 99.9% of germs, but I wasn’t sure if it would discolor the rug – luckily it didn’t!)
- a scrubbing brush
- a bucket
- water hose with spray nozzle
- a open area with plenty of draining and sunlight (I used the street in front of my house, but a driveway would have been more ideal for drainage purposes)
 Follow package directions for diluting the Lysol in a bucket (and add a splash more for good measure). Then pour over the rug and let it sit for about 5 minutes. Repeat the process again, this time working in quarters of the rug to make sure you get the entire area.
 Use the scrubbing brush to work in small sections and brush away the mildew and stains.
 Once you have the entire rug scrubbed down, use the water hose to rinse it off. At this point, I used the brush to help push away excess water to the edges of the rug. As you rinse, you might also notice trouble spots that need additional attention.
 When you’re done, let the sunshine do its job to aid in the drying process! Or you can sling it over a fence or railing to make the excess water run off faster.
Ta-da!! Looks like a brand new rug! Clean and ready for all of my Fall weather porch sitting.


Sep 14, 2016
Today we’re throwing it back to a style shoot we did four years ago. It was an election year, and the upcoming Presidential election was all over the media, so I was inspired to see how a wedding could have a political twist. After a few phone calls, I put together an amazing team to make it happen. From the “rustic Americana” wedding invitations to All-American mini pies in mason jars, we think the details of this event have the potential to sway the vote of any party enthusiast at heart!


 Our beautiful bride looks stunning…


 Doesn’t a Bi-Partisan Sparkler sound like the perfect signature cocktail for this soiree?

 Mason jar pies by Simply Decadent are SO perfect. Adorable (and delicious)!
 “Let’s get this party started!” napkins make a great touch – plus, guests can choose a side – which makes a great conversation starter.


 Look at that handsome, patriotic groom…
 Spirit Ranch is magical in the evenings… don’t you love this setting for a wedding?
 As part of “A Campaign for Happiness” – guests are asked to leave advice for the new Mr. & Mrs. in the “ballot box”
 Using this card with advice for each “side” as the couple serves a “lifelong term” together in wedded bliss…
 Escort cards with tiny campaign buttons make a fun display AND takeaway for the guests to wear as they storm the dance floor…
 LOVE the wording on this invitation. Love.


 Striking red peep toe pumps? Yes, please!
 Before the happy couple speeds away, a quick photo op. And a limo decked out – dignitary style.
Special thanks go out to the following for their tremendous help with making this style shoot come to life:
Spirit Ranch : Linda McMillan Photography : Simply Decadent Bakery : Puttin’ on the Ritz : First Class Tuxedo : Bella’s Bridal : Devault Floral : Gourmet Pantry : Emily Adams on Fire : Limousines of Lubbock : Haute Hair by Cristina : Host and Toast
If you want to see more, we were lucky enough to have the details of this style shoot featured here on Pizzazzerie.com


