Mar 21, 2013
Last year, mom and I attended our first Fall RoundTop Antiques Fair just to “check it out”, but we were overwhelmed by the options – way too many great finds! After much restraint, we ended up only buying what would fit in the car (err, or on it)… And that’s how we drove home with a “chicken coop” tied to the top of the Jeep. We sure did get crazy looks from passing drivers!

Come to find out, what I was calling a “chicken coop”, is actually a “nesting box”, according to my friend Tony (who has chickens). Tomato, tom-ahto, either way- it’s super cool. I originally wanted it for the store – to display cute grab-and-go-gifts – but we never seemed to have the wall space, so it just collected dust in the back. This January, we did a major clean-out at the store, and I finally decided to bring it home. I wanted to hang it on my back porch, but upon closer examination, my granddad thought it was too heavy, so moved on to Plan B.

My granddad is a Jack of all Trades. He’s an 82 year old cotton farmer, mechanic, electrician, plumber, inventor, and overall “fixer”. I love his resourcefulness (he’s a little like MacGyver), and I appreciate his… precision. Let’s just say anything he’s ever fixed or made is going to last awhile. Probably forever. He’s very thorough, and he likes things to be sturdy – like the swing set he made when we were kids with tractor plow bases (buried 6 feet in the ground). That sucker’s not going anywhere!

Once we decided that the nesting box was too heavy to hang, I sketched out a plan for my granddad to build a”stand” for it. He welded iron for the frame, and I couldn’t be more pleased with how it turned out. I made a quick trip to his barn to pick out what material I wanted for the shelf (wood or metal), and he finished it up for me. It’s PERFECT!

This past weekend we secured the box by anchoring it to the brick wall (just in case), and then I completed the look by potting some trailing plants and colorful flowers to place in the openings and on the bottom shelf.

This project was more of an “accidental” re-purpose, since my original vision for the nesting box changed from displaying store products to becoming a planter… but the finished product is even better than I imagined! It’s an unusual display and perfect for my patio! Ta-da… the nesting box has been re-purposed, and I can’t wait to enjoy it!

What have you re-purposed lately?

Mar 17, 2013
Easter is almost here, and this fun, last-minute project was inspired by these burlap bunny napkin rings I saw at Pier 1. With just a few supplies from the local craft store, this project was up and running in no time! It’s really easy to do, and I think this could be a fun project for the kiddos (with an adult to help with the scissors).

DIY Bunny Napkin Rings
For this project you’ll need:
8.5 x 11 sheets of white felt
8.5 x 11 sheets of pink felt
Felt glue
1 inch white pom poms
.5 inch pink pom poms
.2 black pom poms (or small wiggle eyes if you prefer)
Sticky Back VELCRO squares (I used 7/8 inch)
Scissors
Directions:
– On the short side of the felt sheet, use the scissors to cut a strip of white felt approximately 2 inches wide.
– Then cut approximately 1 inch off the end (unless you have really fat napkins)
– Fold the longer piece (now 2 x7 inches) in half
– Fold over the end approximately 1/4 inch. Use the scissors to cut a slit in the folded over part. When you unfold the felt strip, there should be two small holes


– Fold over a white felt piece and cut “ears” in the length you desire
– Using the white “ears” as a guide, cut the same size piece out of the pink felt (folded)
– Trim the pink felt a little on all sides so it’s no longer joined in the middle AND so there’s white on all edges (NOT SHOWN)
– Thread one white “ear” through one slit of the felt strip
– Do the same with the other ear and adjust as needed to make even
– Using felt glue, attach the pink felt pieces to the white “ears”


– Use the glue to attach a large white pom in the back (for the tail), a medium pink pom (for the nose) and two small black poms (or wiggle eyes- for the eyes)
Side note: This would be really cute if you wanted to make bunnies with different colors – just make the pom color for the nose match the felt! Wouldn’t it be fun in different colors around the kids’ table? Red, green, blue, orange?
– Affix one side of the VELCRO sticky back squares to one side of the felt strip
– Roll the felt strip (as it were wrapped around a napkin) and affix the other VELCRO piece
– Wrap around your napkins and set at each place setting. Since the ears are pliable, you can also position them in different ways – something unique for every guest!
Easter table decorations? Check! Now to decide on the menu…
Happy early Easter!

Mar 15, 2013
This past weekend I had the pleasure of my friend Tony coming to visit, and we had such a great time! We worked together several years ago, and now he owns two stores in Dallas, so we deal with a lot of the same things on a daily basis – you know, just “store owner” stuff.
He’s great to bounce ideas off of, we encourage one another… and we laugh A LOT when we’re together. I think everyone needs a friend that “gets” their sense of humor, and I’m blessed that I have that friend in Tony! A weekend full of inside jokes, drinking wine and lounging on the sofa was exactly what I needed (and I think he did too).
Since he took the weekend off to make the trip (to fight the 30-40 mph winds of West Texas), I wanted to make him something special for dinner on Saturday. I decided to go with a Heart of Palm Salad and this Salted Cod dish for three reasons – it’s easy, fresh and delicious!
Salted Cod with Corn and Clams (serves 2)
2 skinless, center-cut 6 oz. cod fillets
1 cup kosher salt
2 ears of corn, shucked
half a lemon
4 T. extra virgin olive oil
1/4 cup flour (for dusting)
12 littleneck clams, scrubbed
3-4 cloves garlic, minced
1 T. butter
1 sprig fresh thyme
2 sprigs cilantro
2 cups dry white wine
freshly ground black pepper
1 T. chopped cilantro, for garnish
Sliced artisan bread, for serving
Completely cover each cod fillet with kosher salt and let sit for exactly 10 minutes.
While the cod is getting nice and salty, bring a medium pot of water to a boil and add the corn. Cook until the corn is done (it will have a nice dark golden color). Remove the corn and let cool enough to cut the kernels off the cob, set aside.
Rinse off the salt and pat dry. Using the flour, lightly dust the fish. Add the olive oil to a large nonstick skillet over med-high heat and add the fish (skinned-side down first). Cook the fish approximately 5 minutes, then flip and cook for another 2 minutes or so. Add the garlic, clams, cilantro springs, and thyme sprig to the skillet. Season with black pepper and add white wine. The original recipe called for only 1 cup of wine, but I’ve made this dish a few times and always  find myself wanting more sauce to dip the bread in… so I use at least 2 cups of wine to start with. Cover the skillet and cook until the clams open, around 7 minutes.
While the clams are steaming, bring a small skillet to med-high heat and melt the butter. Add the corn and stir until heated through.
Once the clams are steamed, discard the herb sprigs and any clams that do not open.
Divide the corn between two large bowls, add the fish, clams, and a generous helping of the sauce. Garnish with chopped cilantro and serve with crusty bread. Enjoy!
This is such a great dish for getting into the warmer weather! Enjoy!
Recipe adapted from July 2011 Food & Wine – 10 Minute Salted Cod

Mar 12, 2013
Happy Spring Break, friends! My facebook timeline is filled with families on vacation, and although I’m not, I thought you happy Spring Breakers might enjoy my “Top 5 Spring Break iPhone Apps”!
Whether you’re hitting the slopes, lounging on the beach, or cruising with the top down on a road trip, you can put these to use! They also don’t require much pre-planning (as opposed to a hotel or flight booking app), so even if you’re on vacation at this very second, you could download and use them today!
Top 5 Spring Break iPhone Apps
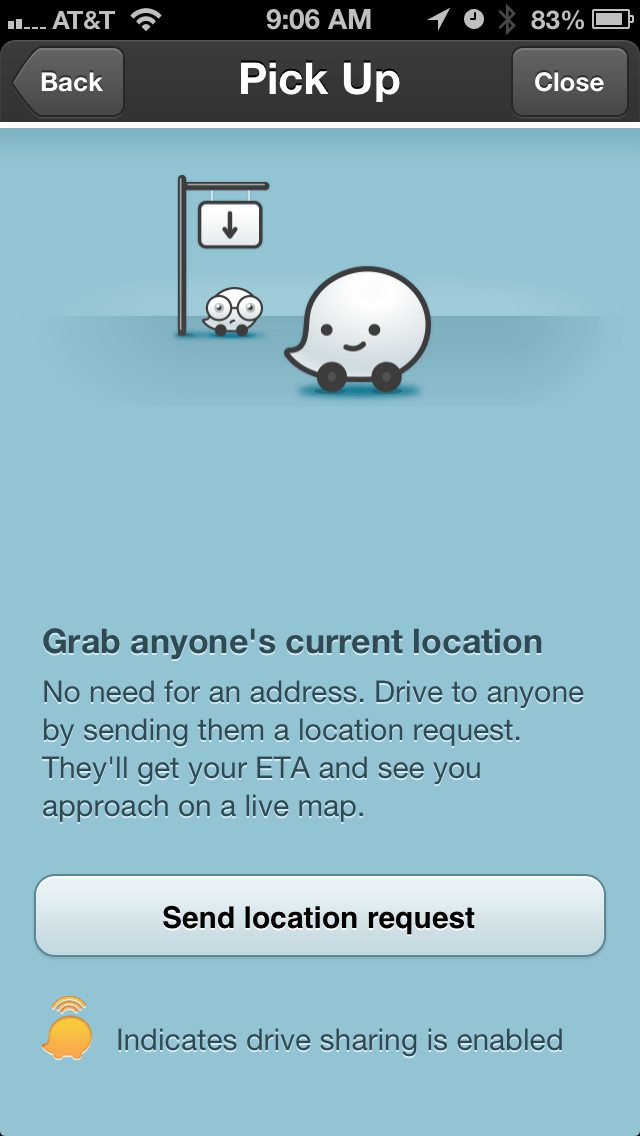
1. Waze (free) – This app combines navigation with convenience – perfect for a road trip! Other users can report accidents, traffic, and road conditions that might help you on your way across town or across the country. It also has a search feature for gas prices, restaurants, and other landmarks near you, which is nice if you just need to stretch your legs. One of my favorite features is the “Pick Up” option. You don’t need an actual address to find your way to a friend. Simply send a “location request” by text (or email) to the contact of your choice. If they accept, it will automatically send you directions to their location. This feature might be handy if you were in a ski town for instance – you could meet up with your friends at a bar or restaurant, even if they don’t know exactly where they are!
2. Weather Channel (free) – No matter where you’re traveling, it’s always good to know what the weather forecast is! You can scroll through the hourly forecast for the day, so you know when that next wave of snowfall is supposed to hit, or when the wind is expected to pick up. Wouldn’t you just hate to be headed to the beach an hour before the rain storm?
 3. Shoot It (free) – This has been one of my favorite vacation apps in the past few years! Shoot It basically turns your phone into a post office. Take a photo (or choose one from your library), add a message, select the recipient from your contacts, and instantly your digital postcard is printed and mailed like a real one – straight from your phone to their mailbox! Pretty cool, huh? Each postcard is only $1.29, so you couldn’t even buy a postcard and mail it for that. Plus, it’s completely personalized with your vacation photos WHILE you’re still on vacation!
4. Food Network On the Road (free) – I’m a big fan of Food Network, so I love that this app has all of the featured restaurants from shows on the Food Network Channel. You can search by location, show (such as Guy Fieri’s Diners, Drive-Ins and Dives), or upcoming featured events (like a St. Patrick’s Day Pub Crawl). If you’re a foodie, this is a great last-minute app for a road trip! On the other hand, if you’re more into planning your fine dining a few days ahead, you might try the Open Table app to snag a great reservation in your destination city.
5. Sleep Machine ($1.99) – When I’m away from home, I usually have a hard time falling asleep, so for me, this app is worth the $1.99! You can choose from a long list of ambient sounds (or use your own playlist), create a mix of sounds, and set a timer or alarm. My favorite noises are the fireplace crackle, Beach 3 (lapping waves) and light rain. As someone who always sleeps with a fan going, I can also customize a symphony of fan noise combined with rain. If you try it, I’d love to hear what combinations you enjoy! 
So there’s my top five iPhone apps for all you Spring Breakers. Do you have any must-have travel apps for vacay?
Mar 3, 2013
 Today the weather was gorgeous and sunny, so I thought a homemade burger would be the perfect lunch on the patio. To accompany my tasty burger, I made one of my favorite sides- Garlicky Fries! They only take about 30 minutes, and they’re not fried, but they taste amazing.
Garlicky Fries
1 medium Russet potato per person
2-4 cloves of garlic, minced (depending on how much you like garlic)
kosher salt
pepper
1-2 T. butter
chopped parsley for garnish (if desired)

Preheat oven to 400 degrees. Rinse the potatoes and chop off both ends, then slice off the sides so the potato takes on a square shape. Cut into fry-sized strips, coat with cooking spray and toss on a baking sheet (make sure you spray the pan too – you don’t want them to stick). Bake potatoes for 15-20 minutes, tossing occasionally to turn. When golden brown, remove from the oven. By the way, for the next step, I’ve found that if I work in smaller batches, it’s easier. Too many fries in the pan make it hard to toss them without smashing them. In a large saucepan, melt some of the butter (I do a little less than 1 T. per batch – too much butter and they’ll just be soggy) and add garlic. Add a batch of fries and toss to coat. Remove from heat, sprinkle with salt, pepper and parsley.